VisLink: Revealing Relationships Amongst Visualizations
Wolfgang Knecht
| start |
|---|
| GUI |
| dataset |
| visualization |
| linking |
| navigation |
| documentation |
Navigation
There are several ways to arrange the different visualization-planes in 3D space to get a nice layout. But first of all the user has to press the "CTRL"-key to switch to the navigation mode. This only works if the main window has the focus.
Translation
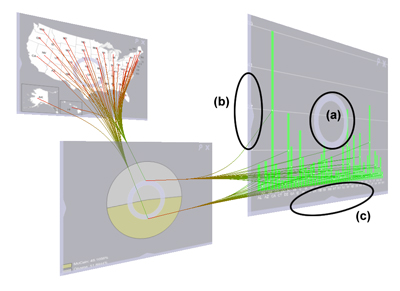
By grabbing the plane at the circle in the middle of the plane (a) with the left mouse button it can be moved along the x and y axis. The middle mouse button can be used to move the plane along the z axis.
Book pages
Dragging the left edge of a plane (b) with the mouse results in a book page like movement. The plane rotates around the y axis.
Garage door
Similar to the "book page" planes can be rotated around the x axis like a garage door by dragging the bottom edge of the planes (c).
Zoom
By clicking on the magnifier symbol in the upper right corner the planes can be viewed in full screen size. A second click on this symbol lets the plane move back to it's previous position.
Delete
Planes can be deleted by clicking on the "X" symbol in the upper right corner of the planes.
Selection
Without pressing the "CTRL"-key the navigation mode is not activated an the user can select a node by clicking on it. If a node is selected all links which do not depend on the selected node disappear. This is useful to explore the dataset and to get a clearer overview. Nodes can be deselected by clicking somewhere in empty space.
Implementation details
For the navigation as well as for the selection mouse picking has to be performed. This is done by transforming the screenspace coordinates of the mouse back to the objectspace coordinates for each plane. If the click happend within the plane each visualization type handles the selection individual. In navigation mode a baseplane from which every visualization-plane inherits handles the transformations.