![]()
![]()
![]()
You can also load the example worlds here.
The smallest possible VRML Example
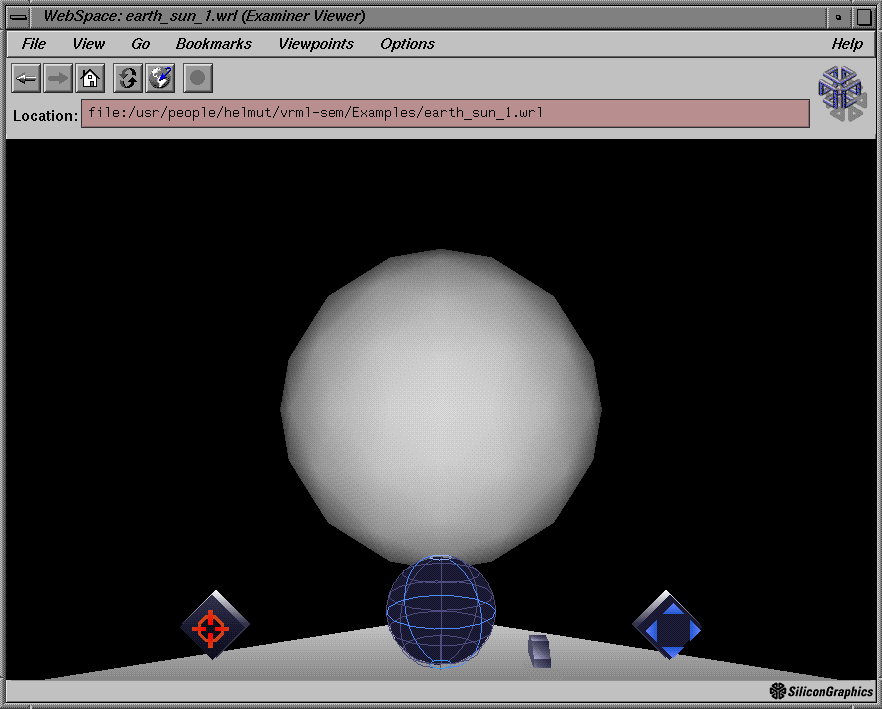
Example 1 - Using the Sphere Node
Example 2 - Using the Separator and Material Nodes
Example 3 - Using emissive color
Example 4 - Using the Transform Node
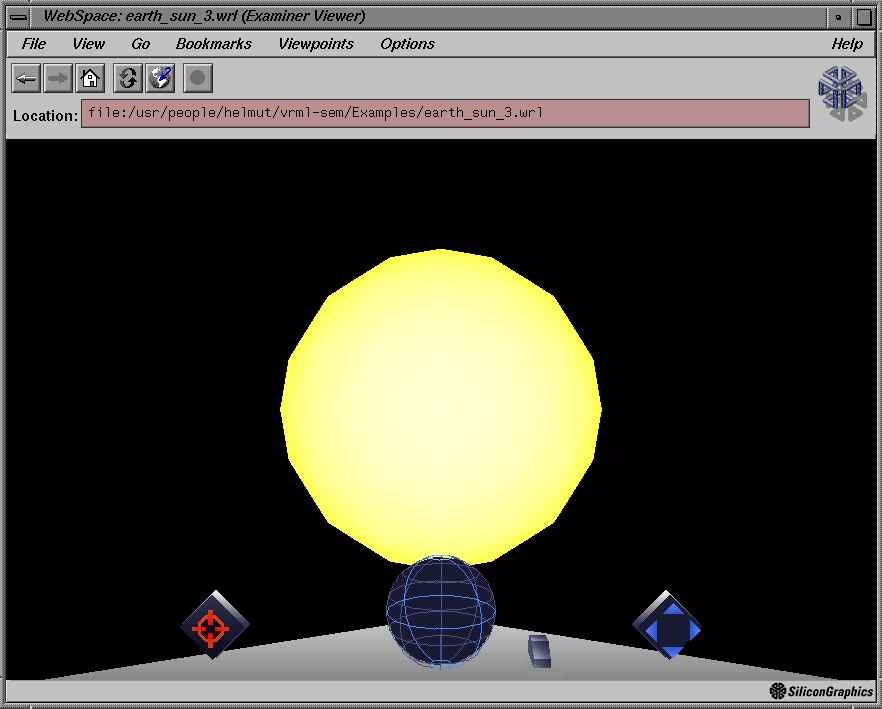
Example 5 - Using the shininess field of Material
Example 6 - Create the Moon
Example 7 - Create a link using the WWWAnchor node
Example 8 - Providing Context by using the description field
Example 9 - Create a link to another VRML - world
Example 10 - Naming objects by using the DEF node
Example 11 - Defining a lightsource
Example 12 - making the Earth more reflective
Example 13 - Defining a Camera for the Scene
Example 14 - Another Camera Example
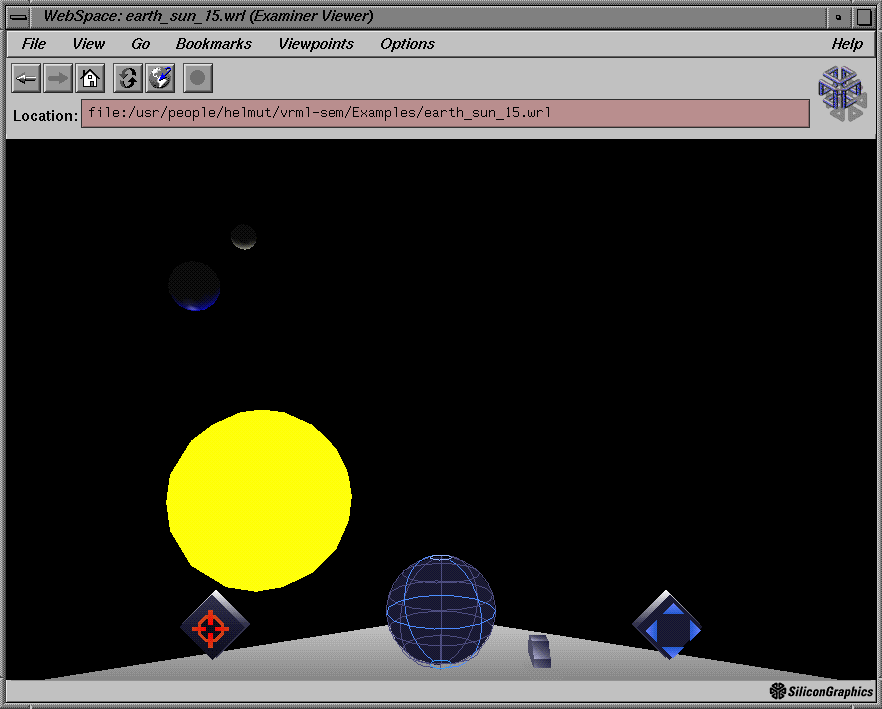
Example 15 - Define several viewpoints by using the switch node
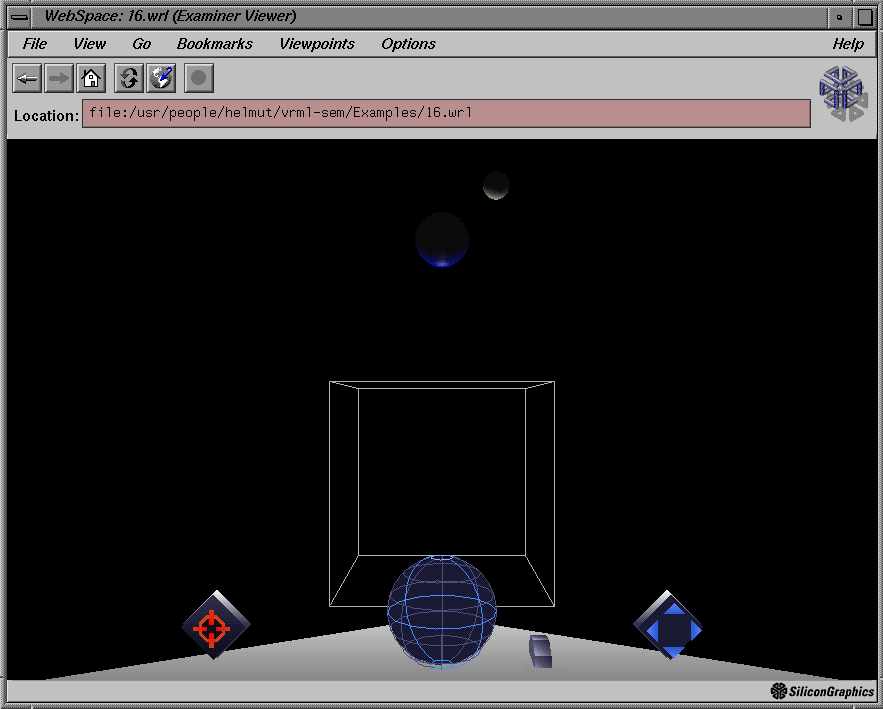
Example 16 - Using the WWWInline node to reference objects
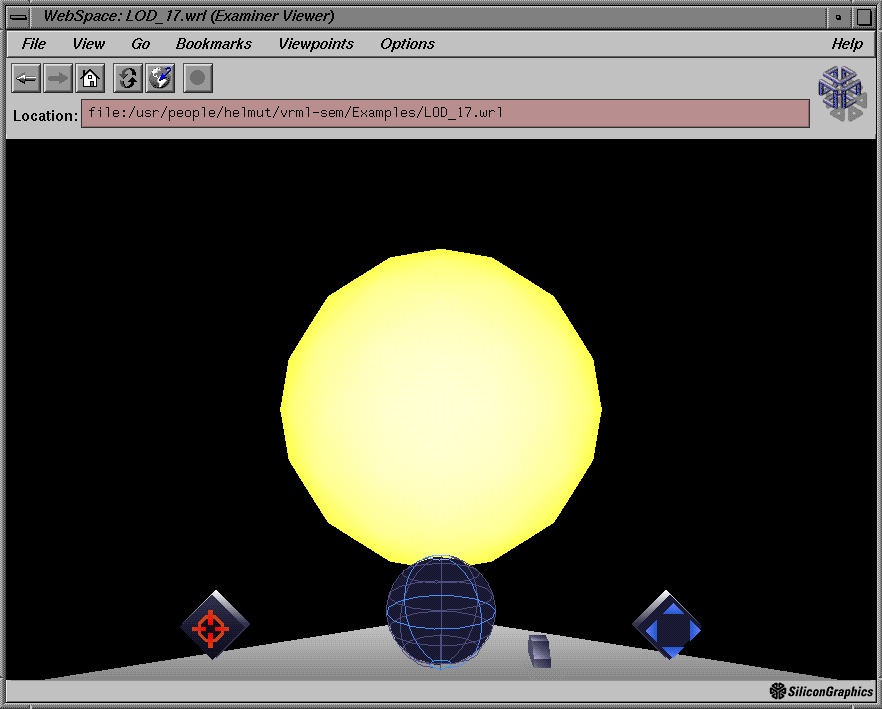
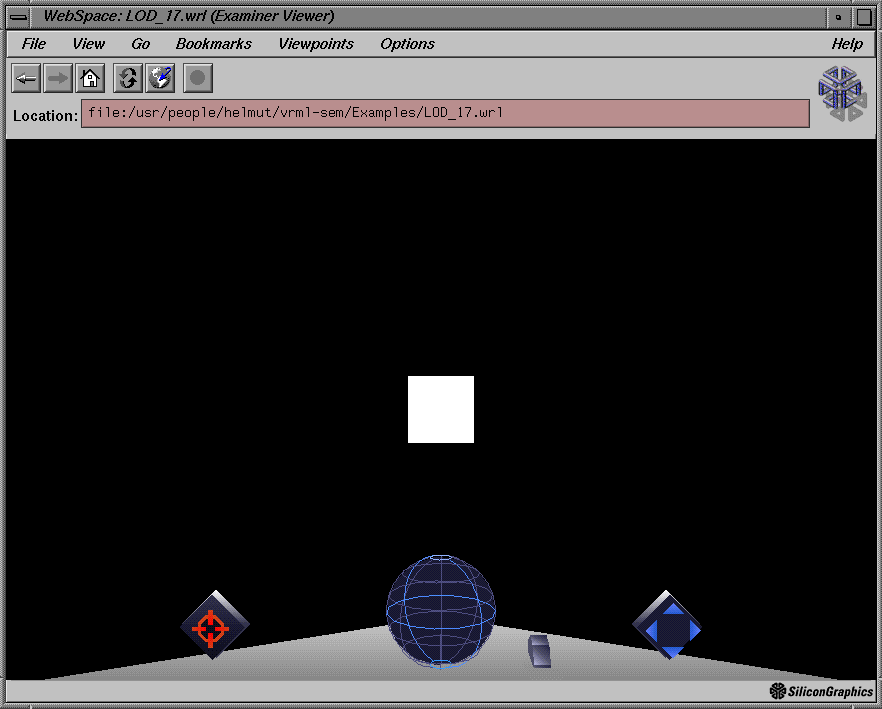
Example 17 - Level of Detail (LOD node)
Example 18 - Texturing the Moon(Texture2 node)
Example 19 - Texturing the Earth
Advanced Enhancements - Building Shapes
Advanced Enhancements - Using USE
First of all, we already mentioned, that every VRML 1.0
file has to start with the line
So, this would be the smallest VRML file one could create.
Of course, this file is not very usefull,
there are no objects in it, so every Browser
would display an empty scene.
We would like to create a world that is more interesting than an empty one,
so why not try and build a sun - earth system (that's easy, too,
because suns and planets are spheres and therefore simple objects).
Let us start with a first example.
I suppose, the first object one would like to have in a
sun-earth system is the sun itself. The sun is a sphere,
so we could use the Sphere nodetype to create it:
With this VRML file we can create a (not yet very realistic) sun,
but it looks more like an ugly ball. We only changed the size of this sun
by setting the radius of the sphere to 10 (because the sun is so big!).
The Separator is one of the group nodes,
these nodes can have other nodes within them. They can be seen as a
box of objects. Everything in this box can be treated as a unit, and can be manipulated
with the same operation. Therefore you can change or manipulate many nodes with
a single operation.
In this next example, we set our sun to a yellow color,
as we usually expect a sun to look like:
Other fields of the Material node include
shininess,
transparency,
ambientColor, and
specularColor.
Now, we have a really nice sun, but for a sun-earth system,
we need an earth, too. So we will create a blue earth in
the next example. As we don't want our earth to be swallowed
by the sun, we have to move the earth far away from it.
We can do this with the Transform node
and use the translation field of this node.
In this field we can specify the x, y, and z values of the
translation.
In our example we will link the earth of the last world, with our second
example-world, so it looks like you can be teleported to the earth by
clicking on it, and then only watch the sun from there.
Our last example can now be changed by this concept, and
looks afterwards like the following:
Still we can try to make it a little more realistic with every
step we take from here. In the next example, we
try to make the earth even shinier (more
like water) by using the
specularColor field of the
Material node.
The next step we want to take now, is
defining a camera
for our scene (the earth-sun model).
By using the Switch node, we can define
several different Viewpoints in the scene
(cameras), and, by giving the Switch node
the name 'Cameras', Webspace
knows, that it should take them into its Viewpoints-Menu.
This is done in the next example. Like this one can create
a guided tour and follow it by simply clicking
the viewpoint entries in the menu in the desired order.
The WWWInline node has three fields. In the
name field the referenced URL or filename is
given in quotes. In the bboxSize field and
the bboxCenter field define a bounding box for
the referenced object, which is displayed as long as the
object could not be referenced.
The LOD node has one field, range,
which is an array of distance values. An array in VRML is a list of
values separated by commas and enclosed in brackets.
The next example is a very simple (but also silly) one, but it shows
how LOD works in VRML. Normally you should use different representations
of the same objects, and not change the objects when coming closer or
moving farther away.
VRML defines the Texture2 node to provide a
mechanism by which texture maps can be applied to any
visible VRML object.
The number can be easier remembered, when knowing, that it also gives
the number of bytes associated with each pixel in the image.
After the type value (third value in the image field), the value for
each point within the image has to be provided explicitly.
These values are given from the lower left hand corner of the image
through the upper right hand corner of the image, one row at a time.
In this example we texture map the Earth with a texture map of its surface.
You could also instead of referencing to a local filename (the texture map) use
an URL to reference an image, that is on the other side of our planet.
Before we move on to a discussion of complex shapes in VRML,
it is important to note one of the holes in the VRML
1.0 specification: There is no standart texture
map image file format.
An RGB format texture map, like the one in the above example,
will be read in and wrapped properly in WebSpace,
but it won't work in other VRML Browsers like WorldView
or QMosaic. WorldView will read in GIF and JPEG images
for texture maps, but won't read in RGB format, and so on.
VRML has the capacity to define arbitrary shapes, and it defines several
nodes that must be used together to create these arbitrary shapes.
A set of points can be specified in VRML with the Coordinate3
node. Once a set of points has been defined, the IndexedFaceSet node is used to create polygons from
these points. These two nodes are always used together:
The Coordinate3 node gives a list ( called
array ) of points. Each point is given by specifying
the x, y, and z position of the point, followed by a comma, then
the next values for the next point, and so on. IndexedFaceSet references this array of points -
where the first point is defined as array entry zero -
as it specifies the connection between these points to
create polygons.
Let's look at a small example:
The Coordinate3 and indexedFaceSet nodes together define
something known as a polygon mesh or
polymesh; that is the surface of a
complex object.
The USE feature of VRML enables you
to create multiple instances of a node or a group.
USE isn't really a node, but it tells the
VRML Browser to use a previously defined node,
without having to specify the content of this nopde again.
USE relies upon the naming ability
provided with the DEF construct.
DEF gives a node a name. This name
can then be supplied to USE.
USE-instanced nodes can be grouped
with other nodes, so it's possible, to take a shape and
give it material or texture qualities unique to that
instance of the object. They don't all have to look
the same.
A short example will make the usage of USE
clearer:
This page was created by
Helmut
Doleisch and
Edgar
Weippl on November 26, 1996.
The smallest possible VRML Example
In this section we will look at some of the key features of VRML.
We will do this by developing some examples. As most of the examples
use parts of the examples, that have been created before, the new
parts of the examples are always printed strong.
#VRML V1.0 ascii
Example 1 - Using the Sphere Node
#VRML V1.0 ascii

# Example 1 - the Sun

# Here comes the Sun
Sphere {
        radius 10                   # the Sun is very big
}
Example 2 - Using the Separator and Material Nodes
To make the sun a bit more realistic we try to change its color.
For this purpose we introduce two new node types: the Separator
node is used to group nodes, the Material node
sets the material paramters for all the following objects in this group.
That, and the fact, that the scene graph of
a VRML file is orderd,
that meens, that nodes that come first, influence nodes following them,
is, why the Material node sets the material parameters
for all of the following nodes.
#VRML V1.0 ascii

# Example 2 - using the Separator and Material Nodes

# Here comes the Sun
# The Separator node groups everything within it together
Separator {
       # The material will affect all subsequent nodes
       # The Sun becomes yellow
       Material {
              diffuseColor 1 1 0    # R G B
       }
       Sphere {
               radius 10                   # the Sun is very big
       }
}
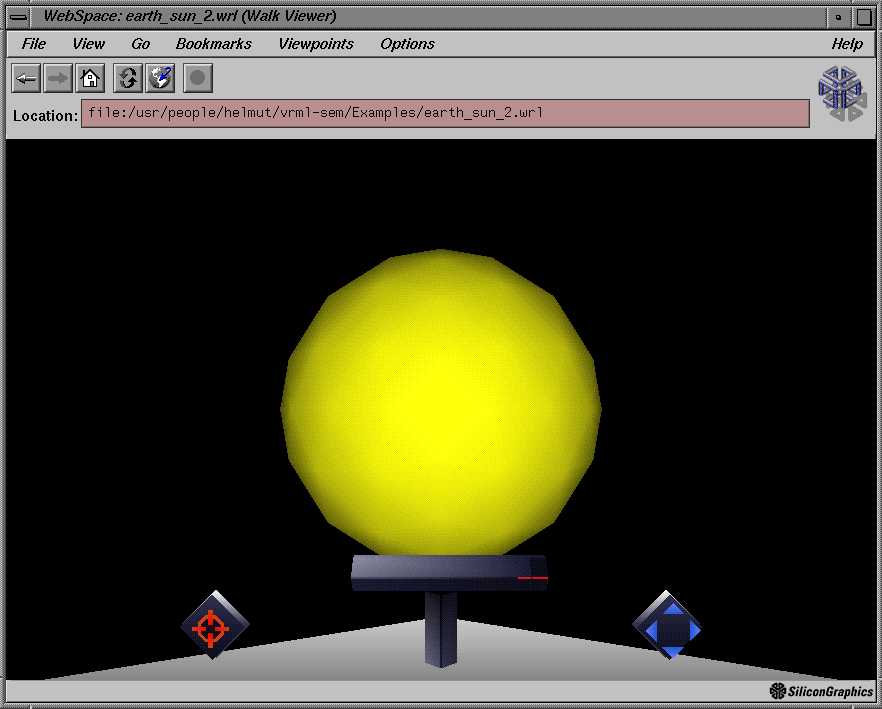
Example 3 - Using emissive color
The sun should be glowing, like the real one.
To achieve this, we can change the diffuseColor field
to an emissiveColor field, that means, we specify the
color that is emitted from the surface, the sun immediatly brightens up
(see next example).
#VRML V1.0 ascii

# Example 3 - using emissive colors

# Here comes the Sun
# The Separator node groups everything within it together
Separator {
       # The material will affect all subsequent nodes
       # The Sun becomes yellow
       # Switch to emissive color because Sun gives off light
       Material {
              emissiveColor 1 1 0    # R G B
       }
       Sphere {
               radius 10                   # the Sun is very big
       }
}
Example 4 - Using the Transform Node
We also use a new Material node, so that we don't end up with
a yellow earth.The example looks then as follows:
#VRML V1.0 ascii

# Example 4 - using the Transform Node, creating the Earth

# Here comes the Sun
# The Separator node groups everything within it together

Separator {

       # The material will affect all subsequent nodes
       # The Sun becomes yellow
       # Switch to emissive color because Sun gives off light

       Material {
              emissiveColor 1 1 0    # R G B
       }

       Sphere {
               radius 10             # the Sun is very big
       }

       # We place the Earth within its own Separator, to keep it isolated

       Separator {

              # Move the Earth away from the Sun

              Transform {
                     translation 0 20 20
              }

              # Color the Earth blue, and make it absorb light

              Material {
                     diffuseColor 0 0 1
              }

              # Finally, create the earth

              Sphere {
                     radius 2         # earth is a lot smaller
              }
       }
}

Example 5 - Using the shininess field of Material
So, now we have a sun and an earth, but the earth should
look more shiny (blue), because it should look like real
water, and water is shiny. So we can improve the world by
using the shininess field of the
Material node. This is done in the next example:
#VRML V1.0 ascii

# Example 5 - make the earth shiny

# Here comes the Sun
# The Separator node groups everything within it together

Separator {

       # The material will affect all subsequent nodes
       # The Sun becomes yellow
       # Switch to emissive color because Sun gives off light

       Material {
              emissiveColor 1 1 0    # R G B
       }

       Sphere {
               radius 10             # the Sun is very big
       }

       # We place the Earth within its own Separator, to keep it isolated

       Separator {

              # Move the Earth away from the Sun

              Transform {
                     translation 0 20 20
              }

              # Color the Earth blue, and make it absorb light
              # But also make it reflective, like water

              Material {
                     diffuseColor 0 0 1
                     shininess 0.9       # Water is rather shiny
              }

              # Finally, create the earth

              Sphere {
                     radius 2         # earth is a lot smaller
              }
       }
}
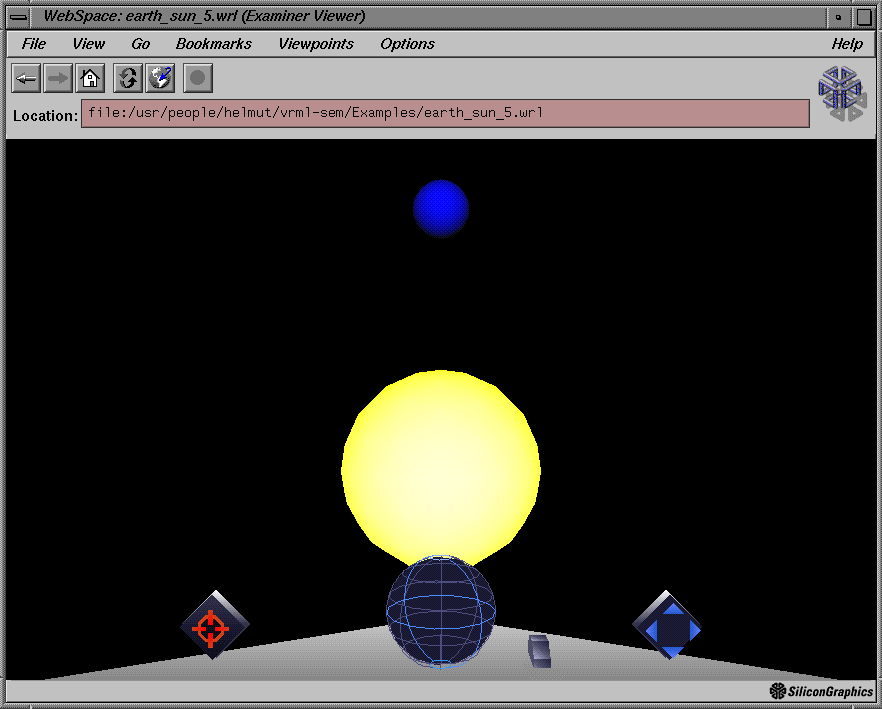
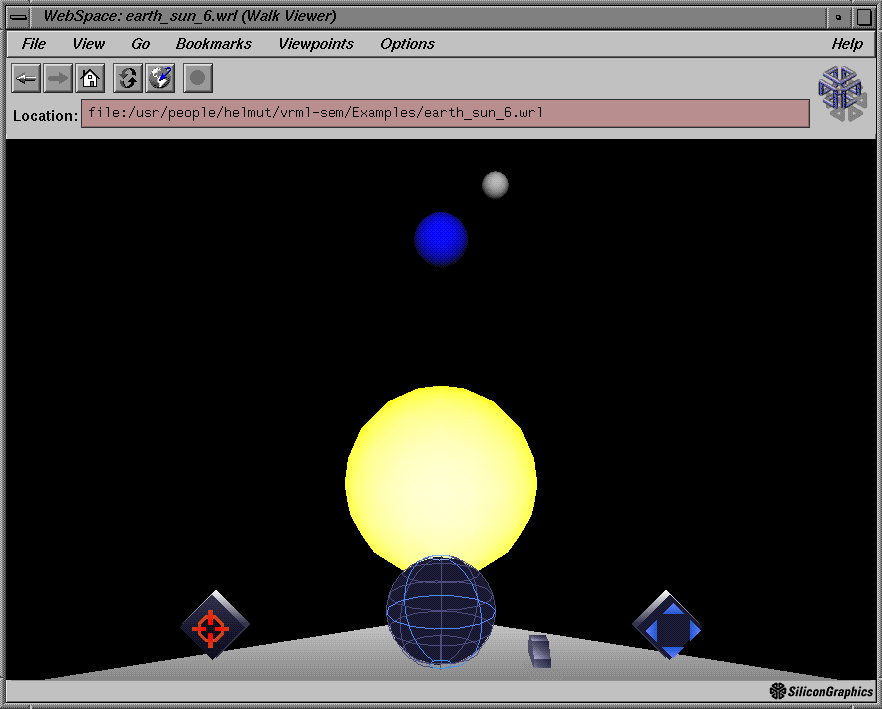
Example 6 - Create the Moon
Now we have sun and earth, the next object we miss is the moon.
As there is no limit, how deep a set of group nodes can go, we
use another Separator node, to encapsulate the moon
from the other objects. We also use a Material node
again, to color the moon grayish and a Sphere node
to finally create the moon.
This even more complete sun-earth model is represented by the
next VRML Example-file:
#VRML V1.0 ascii

# Example 6 - Create the Moon as a child of the Earth

# Here comes the Sun
# The Separator node groups everything within it together

Separator {

       # The material will affect all subsequent nodes
       # The Sun becomes yellow
       # Switch to emissive color because Sun gives off light

       Material {
              emissiveColor 1 1 0    # R G B
       }

       Sphere {
               radius 10             # the Sun is very big
       }

       # We place the Earth within its own Separator, to keep it isolated

       Separator {

              # Move the Earth away from the Sun

              Transform {
                     translation 0 20 20
              }

              # Color the Earth blue, and make it absorb light
              # But also make it reflective, like water

              Material {
                     diffuseColor 0 0 1
                     shininess 0.9       # Water is rather shiny
              }

              # Finally, create the earth

              Sphere {
                     radius 2         # earth is a lot smaller
              }

              # The Moon gets its own Separator, too

              Separator {

                     # The Moon is just outside the Earth

                     Transform {
                            translation 4 4 0
                     }

                     # Color the Moon gray and make it absorb light
                     # The Moon is only a little shiny

                     Material {
                            diffuseColor 0.7 0.7 0.7
                            shininess 0.3
                     }

                     # Finally, create the Moon

                     Sphere {
                            radius 1     # very tiny Moon
                     }
              }
       }
}
In order to not let our examples grow longer and longer for
ever, the following examples will be written with less
comments (the old ones are not repeated) and in a more
compressed way. It is not necessary to structure the
definitions the way it has been done before, it's only better
for understanding.
Example 7 - Create a link using the WWWAnchor node
A big advantage of VRML is that every object can be linked to
the World Wide Web. The node that can be used for that, is called
WWWAnchor. It is a group node, which means that all
the nodes within the WWWAnchor node are anchored to the same
Uniform Resource Locator(URL) within the Web.
The next example uses such a WWWAnchor, to link the sun to
the homepage of the Computergraphics Institute at the University
of Technology of Vienna.
#VRML V1.0 ascii
# Example 7 - Create a link from the Sun to an HTML document

# Here comes the Sun
# The Separator node groups everything within it together
Separator {
       Material {
              emissiveColor 1 1 0    # R G B
       }

       # The WWWAnchor node is a group node
       # This means that all objects within it are linked to the URL
       # We want to link the Sun

       WWWAnchor {
              name "http://www.cg.tuwien.ac.at/"

              Sphere {
                      radius 10             # the Sun is very big
              }
       }

       # We place the Earth within its own Separator, to keep it isolated
[...]
Example 8 - Providing Context by using the description field
If you now point on the sun with your mousecursor, the sun will
change its appearance, and in the statusarea of your VRML Browser
is the URL of the link displayed. But sometimes, people who are
not real computer experts want to use this Browser, too, and they won't
understand the URL, so it might be more usefull, to provide some context.
You can use the description field of the
WWWAnchor node. There you can give the user any
information you want, for example an description in a sentence, where
the link is pointing to.
In the next example we provided the user of this sun-earth model with
some more usefull description, than displaying only the URL.
#VRML V1.0 ascii
# Example 8 - Create a descriptive link

# Here comes the Sun
# The Separator node groups everything within it together
Separator {
       Material {
              emissiveColor 1 1 0    # R G B
       }

       # The WWWAnchor node is a group node
       # This means that all objects within it are linked to the URL
       # We want to link the Sun

       WWWAnchor {
              name "http://www.cg.tuwien.ac.at/"

              # Using the description field, we provide context for the user

              description "A link from the Sun to the CG-Institute"

              Sphere {
                      radius 10             # the Sun is very big
              }
       }

       # We place the Earth within its own Separator, to keep it isolated
[...]

Example 9 - Create a link to another VRML - world
Of course you can not only link HTML documents to your objects,
but any types of data (movies, audio files,...). And it is possible,
to link a VRML world with another. For example you could link two different
VRML worlds, representing two different Rooms of a house, and link them
with the door. Then you could move from one room into the other
by simply clicking the door.
#VRML V1.0 ascii
# Example 9 - create a portal from the Earth to another VRML world
# Here comes the Sun
# The Separator node groups everything within it together
Separator {
       Material {
              emissiveColor 1 1 0    # R G B
       }
       WWWAnchor {
              name "http://www.cg.tuwien.ac.at/"
              description "A link from the Sun to the CG-Institute"
              Sphere {
                      radius 10             # the Sun is very big
              }
       }
       Separator {
              Transform {
                     translation 0 20 20
              }
              Material {
                     diffuseColor 0 0 1
                     shininess 0.9       # Water is rather shiny
              }

              # We want to link the Earth to another VRML world

              WWWAnchor {
                     name "earth_sun_2.wrl"
                     description " A link to our second example world"

                     Sphere {
                            radius 2         # earth is a lot smaller
                     }

              }
              # The Moon gets its own Separator, too
[...]
Example 10 - Naming objects by using the DEF node
VRML nodes have one quality we haven't yet covered - a name,
which identifies that node in particular from all other nodes
in the scene graph. Nodes are given names using DEF.
Placing DEF, and then the name of the node, before
the node's definition gives the node that name.
If one wants to put spaces in the name, he has to enclose it in quotes.
#VRML V1.0 ascii
# Example 10 - We are giving our objects DEF names
# Here comes the Sun
# The Separator node groups everything within it together
DEF SolarSystem Separator {
       DEF SolarMaterial Material {
              emissiveColor 1 1 0    # R G B
       }
       DEF SUN2CG WWWAnchor {
              name "http://www.cg.tuwien.ac.at/"
              description "A link from the Sun to the CG-Institute"
              DEF SunBall Sphere {
                      radius 10             # the Sun is very big
              }
       }
       DEF EarthSystem Separator {
              DEF EarthPlacement Transform {
                     translation 0 20 20
              }
              DEF EarthMaterial Material {
                     diffuseColor 0 0 1
                     shininess 0.9       # Water is rather shiny
              }
              DEF EARTH2OTHERWORLD WWWAnchor {
                     name "earth_sun_2.wrl"
                     description " A link to our second example world"
                     DEF EarthBall Sphere {
                            radius 2         # earth is a lot smaller
                     }

              }
              DEF MoonSystem Separator {
                     DEF MoonPlacement Transform {
                            translation 4 4 0
                     }
                     DEF MoonMaterial Material {
                            diffuseColor 0.7 0.7 0.7
                            shininess 0.3
                     }
                     DEF MoonBall Sphere {
                            radius 1     # very tiny Moon
                     }
              }
       }
}
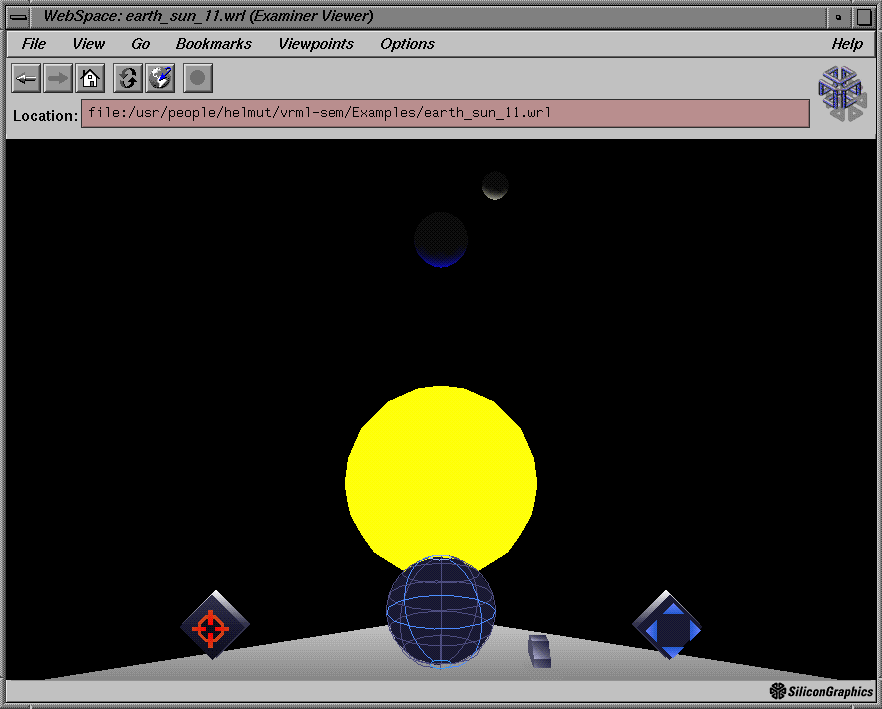
Example 11 - Defining a lightsource
Although our model looks quite nice by now, the lightning
is still wrong. Our sun is still dark and not giving off any
light. The only reason, why we saw any objects is, because the VRML Browsers
install a default lightsource, but this is the wrong one for our
model of course. If we install a lightsource in the scene,
then the default lightsource will be dropped by the Browsers.
There are different types of lightsources
(PointLight, SpotLight, DirectionalLight) in VRML, but for the sun
the PointLight node is the suitable one.
We set the sunlight to very bright (intensity = 1), and the
sunlight to nearly white, because that's what the sunlight is rather
than yellow.
#VRML V1.0 ascii
# Example 11 - Let the Sun illuminate the Earth and Moon

# Here comes the Sun
# The Separator node groups everything within it together
DEF SolarSystem Separator {
       DEF SolarMaterial Material {
              emissiveColor 1 1 0    # R G B
       }

       # We make the Sun shine
       # A Pointlight shines equally in all directions, like the Sun does

       DEF SunLight PointLight {
              intensity 1               # The Sun is very bright
              color 1 1 0.9             # The Sunlight is nearly white
       }

       DEF SUN2CG WWWAnchor {
              name "http://www.cg.tuwien.ac.at/"
              description "A link from the Sun to the CG-Institute"
              DEF SunBall Sphere {
                      radius 10             # the Sun is very big
              }
       }

       # We place the Earth within its own Separator, to keep it isolated
[...]
Example 12 - making the Earth more reflective
Now we have the right lightning of the scene,
it looks a lot more realistic with that than it did
before.
#VRML V1.0 ascii
# Example 12 - The Earth reflects more of the Sunlight (specularColor)
[...]

       # We place the Earth within its own Separator, to keep it isolated

       DEF EarthSystem Separator {

              # Move the Earth away from the Sun

              DEF EarthPlacement Transform {
                     translation 0 20 20
              }

              # Color the Earth blue, and make it absorb light
              # But also make it reflective, like water

              DEF EarthMaterial Material {
                     diffuseColor 0 0 1
                     specularColor 0.9 0.9 0.9  # a little more shiny
                     shininess 0.9       # Water is rather shiny
              }
[...]

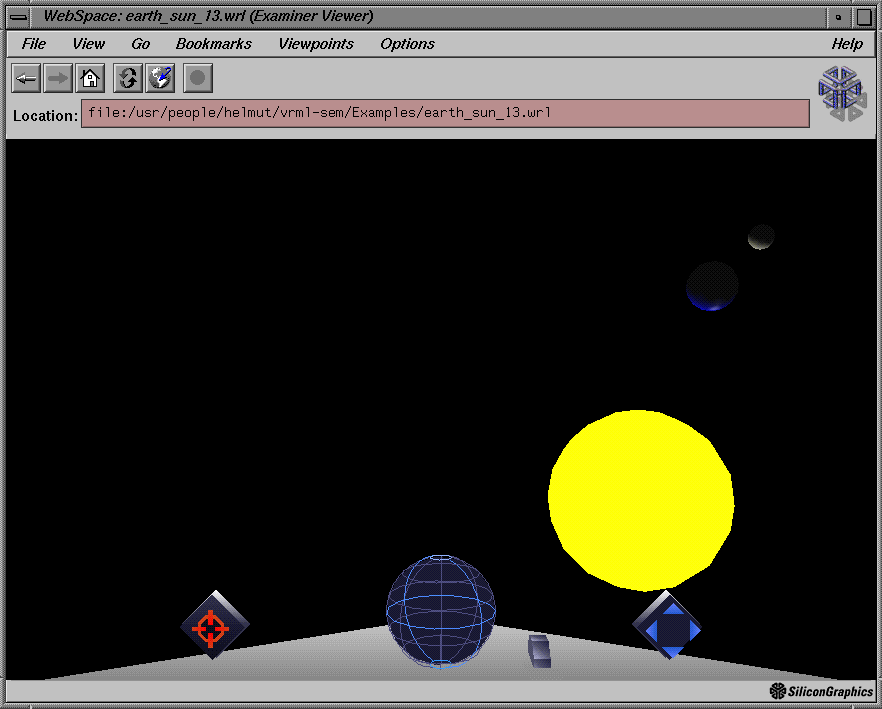
Example 13 - Defining a Camera for the Scene
But we have also used another built-in behavior of the
VRML Browsers: To view a scene in VRML, you have to
create at least one camera, which sets up a viewpoint,
from which to capture the scene. If you don't create a camera,
one will be created automatically for you by the Browser.
In VRML 1.0 there are two camera nodes, that
can be used to define a camera:
PerspectiveCamera
and OrthographicCamera.
In our example we will use the PerspectiveCamera node.
#VRML V1.0 ascii
# Example 13 - Define a Camera for the world using the PerspectiveCamera node

# This Camera gives you a different point of view

DEF StartingCamera PerspectiveCamera {
       position -22 10 73         # x, y, z coordinates of the position
       orientation 0.25 0 0.63 0  # we twist the orientation of the camera
       focalDistance 200
}

# Here comes the Sun
# The Separator node groups everything within it together

DEF SolarSystem Separator {
[...]
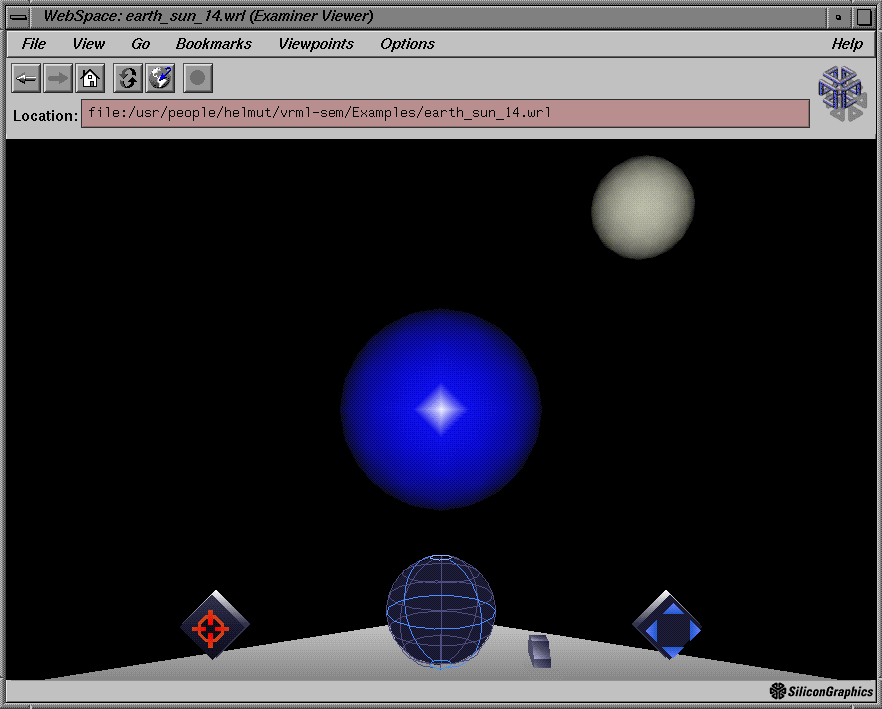
Example 14 - Another Camera Example
In VRML the group nodes act as insulators - they
really do prevent nodes within the scene graph from knowing
anything about other nodes in other groups within the scene graph.
That is why, if you put the camera into the Separator that
defines the earth-moon system, you won't be able to
see the sun;
it's not within the PerspectiveCamera
group, so that camera doesn't know about it.
#VRML V1.0 ascii
# Example 14 - We define a camera inside a group node
# Because it's inside the group node, we only see the Earth and Moon
# Here comes the Sun
# The Separator node groups everything within it together
DEF SolarSystem Separator {
       DEF SolarMaterial Material {
              emissiveColor 1 1 0    # R G B
       }
       DEF SunLight PointLight {
              intensity 1               # The Sun is very bright
              color 1 1 0.9             # The Sunlight is nearly white
       }
       DEF SUN2CG WWWAnchor {
              name "http://www.cg.tuwien.ac.at/"
              description "A link from the Sun to the CG-Institute"
              DEF SunBall Sphere {
                      radius 10             # the Sun is very big
              }
       }
       DEF EarthSystem Separator {
              DEF EarthPlacement Transform {
                     translation 0 20 20
              }

              # From this point of view, all you can see is the Earth and Moon

              DEF EarthView PerspectiveCamera {
                     position 0 0 13
                     orientation 0 0 1 0
                     focalDistance 200
              }

              DEF EarthMaterial Material {
                     diffuseColor 0 0 1
                     specularColor 0.9 0.9 0.9  # a little more shiny
                     shininess 0.9       # Water is rather shiny
              }
              DEF EARTH2OTHERWORLD WWWAnchor {
                     name "earth_sun_2.wrl"
                     description " A link to our second example world"
                     DEF EarthBall Sphere {
                            radius 2         # earth is a lot smaller
                     }

              }
              DEF MoonSystem Separator {
                     DEF MoonPlacement Transform {
                            translation 4 4 0
                     }
                     DEF MoonMaterial Material {
                            diffuseColor 0.7 0.7 0.7
                            shininess 0.3
                     }
                     DEF MoonBall Sphere {
                            radius 1     # very tiny Moon
                     }
              }
       }
}
Example 15 - Define several viewpoints by using the switch node
Now we want to have a look at another very important
node type of VRML, the Switch
node. The Switch node is a group node,
that selects one node from an entire group
based upon the index value of its only field
whichChild. The first node
within the group has the index zero, all the following
count up from zero.
#VRML V1.0 ascii
# Example 15 - We define a list of viewpoints by using the switch node

# The Switch node creates a group
# Only the node that corresponds to whichChild is visible to VRML
# Entries start from zero and count up
# WebSpace looks for a Switch node named "Cameras"

DEF Cameras Switch {
       whichChild 1      # start with the second node in the group

       DEF EarthCamera PerspectiveCamera {
              position 20 10 73
              orientation 0.25 0 0.63 0
              focalDistance 200
       }

       # This is the default camera:

       DEF EntryView PerspectiveCamera {
              position 0 0 60
              orientation 0 0 1 0
              focalDistance 200
       }
}

# Here comes the Sun
# The Separator node groups everything within it together
DEF SolarSystem Separator {
[...]

Example 16 - Using the WWWInline node to reference objects
Another very nice and important thing about the World Wide Web
is inclusion by reference. That means that you don't have to build
something explicitly, but can reference parts of it from all over
the world.
For example, when a Web page is composed of text and some pictures,
then in HTML you can say something like <img src="....">. That says
your Web browser, that it should go to the given adress and get the image
at the same time it gets the text.
This is called image inlining - the image is included
by reference. With VRML we can do something very similar. There exists a
VRML node called WWWInline, that is a group node, and can
replace any group node inside of a VRML document. In the next example
we replace the sphere node that defines the sun with a reference to our
third VRML example, which also defines a sphere node.
#VRML V1.0 ascii

# Example 16 - We reference the Sun using WWWInline

# Here comes the Sun
# The Separator node groups everything within it together

DEF SolarSystem Separator {

DEF SolarMaterial Material {
      emissiveColor 1 1 0    # R G B
}

DEF SunLight PointLight {
      intensity 1               # The Sun is very bright
      color 1 1 0.9             # The Sunlight is nearly white
}

DEF SUN2CG WWWAnchor {
      name "http://www.cg.tuwien.ac.at/"
      description "A link from the Sun to the CG-Institute"

      # We reference the Sun using the WWWInline node

      WWWInline {
	     name "earth_sun_3.wrl"
	     bboxSize 20 20 20       # As big as the Sun is
	     bboxCenter 0 0 0        # From the center of the Sun
      }
}

# We place the Earth within its own Separator, to keep it isolated
[...]
Example 17 - Level of Detail (LOD node)
Another thing you can use in VRML is Level-of-detail representations.
There exists a special node, called LOD. Using it, you
can switch between different representations of the same node based upon
how far away you are from the node.
The LOD node is a group node, within which always
n+1 other nodes have to be,
where n is the number of values in the
range field.
#VRML V1.0 ascii

# Example 17 - Example for level-of-detail (LOD)

DEF LOD_EXAMPLE Separator {

       # The LOD node groups everything within it together

       DEF LOD_NODE LOD {
              range [ 50,100 ]

              # if closer than 50 units, the object is a yellow Sphere

              DEF CloseIn Separator {

                    Material {
                           emissiveColor 1 1 0
                    }

                    Sphere {
                           radius 10     # Big Sphere (like the Sun)
                    }
              }

              # if closer than 100 units, but greater than 50, a magenta Cone

              DEF Medium Separator {

                    Material {
                           emissiveColor 1 0 1
                    }

                    Cone {
                           bottomRadius 10
                           height 10
                    }
              }

              # if further away than 100 units, a white Cube

              DEF FarAway Separator {

                    Material {
                           emissiveColor 1 1 1
                    }

                    Cube {
                           width 10
                           height 10
                           depth 10
                    }
              }
       }
}

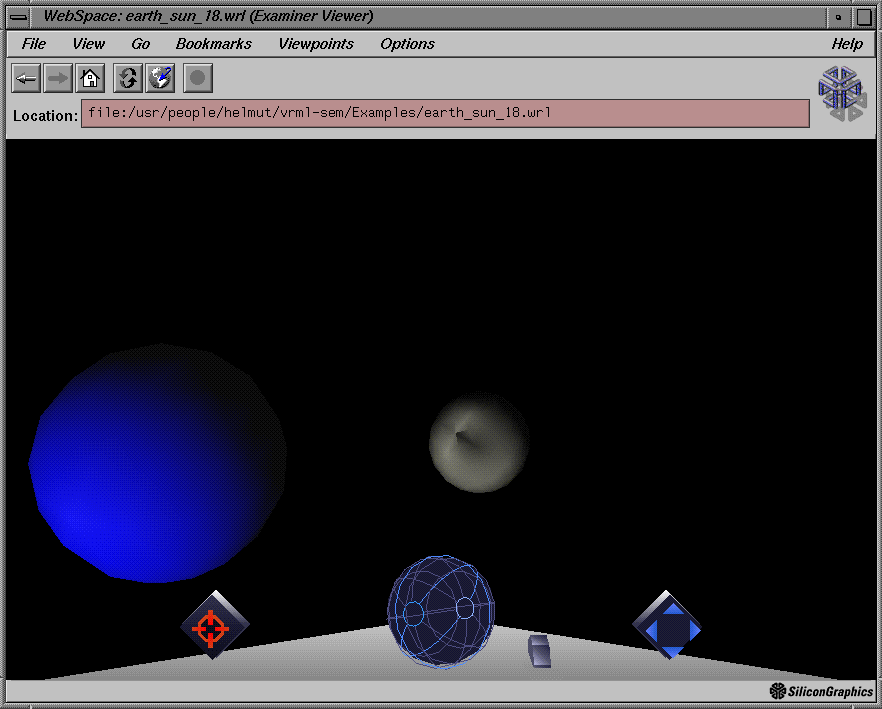
Example 18 - Texturing the Moon(Texture2 node)
Texture maps are images applied to the surfaces of polygons.
Our solar system looks good, but we can make it look better and more
realistic by using textures.
A texture map is an image, a picture. The Texture2
node has an image field that defines the picture
associated with the texture map. This field is a bit more complicated,
than the ones we have seen before. The first two values in the field
give the width and height of the image, specified as integers. The third
value defines the type of image. There are four possible types of images:
In the next example we use a texture map to texture the surface of the
moon.
#VRML V1.0 ascii

# Example 18 - We texture map the Moon manually

[...]

              # The Moon gets its own Separator, too

              DEF MoonSystem Separator {

                     DEF MoonPlacement Transform {
                            translation 4 4 0
                     }

                     DEF MoonMaterial Material {
                            diffuseColor 0.7 0.7 0.7
                            shininess 0.3
                     }

                     # small texture map. just to show how it works
                     # it's in black/gray/white

                     Texture2 {
                          # Define a 4 x 4 pixel texture map using RGB values

                          image 4 4 3

                          # Here is the map from lower left, to upper right

                          0xC0C0C0 0x808080 0xFFFFFF 0x404040
                          0x808080 0x202020 0x808080 0xC0C0C0
                          0x202020 0x808080 0xFFFFFF 0x808080
                          0x808080 0xC0C0C0 0x808080 0x202020
                     }

                     # Finally, create the Moon

                     DEF MoonBall Sphere {
                            radius 1     # very tiny Moon
                     }
              }
       }
}
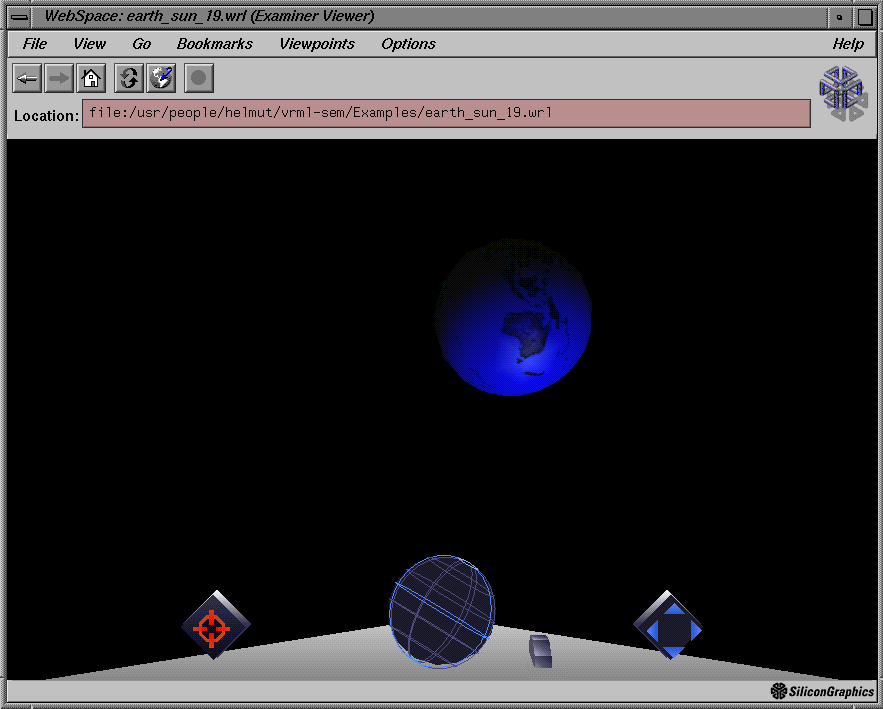
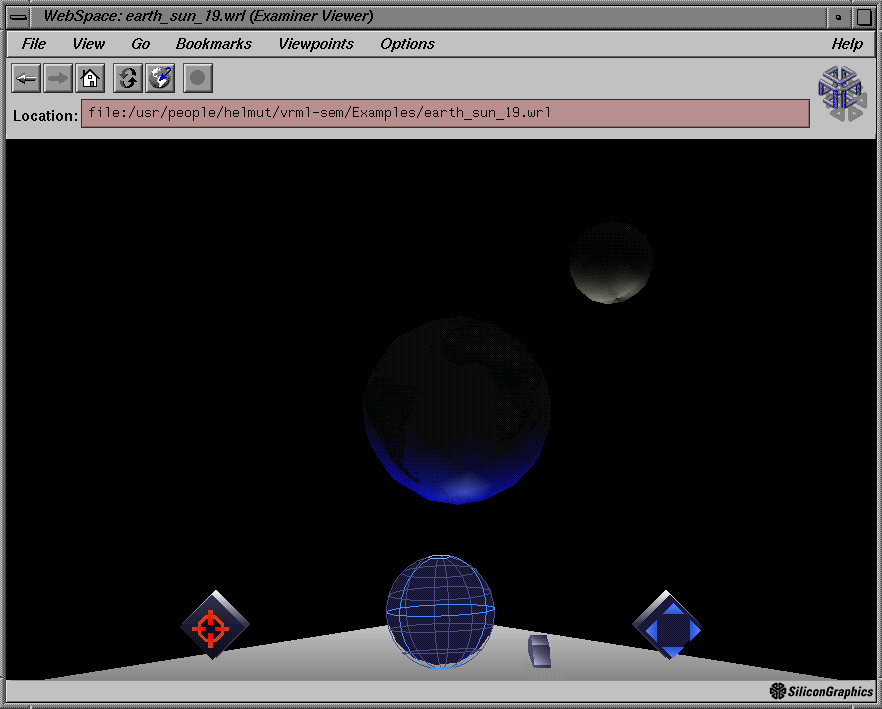
Example 19 - Texturing the Earth
Hand-crafting texture maps is a difficult process, unless the images are
quite simple.
The Texture2 node has another field, called
filename, which can be used to specify the name of an
image file to be read in and used as the texture map. If the
filename field is used within a Texture2 node, the image field should
not be used.
#VRML V1.0 ascii

# Example 19 - We texture map the Earth with its surface

[...]

       # We place the Earth within its own Separator, to keep it isolated

       DEF EarthSystem Separator {

              DEF EarthPlacement Transform {
                     translation 0 20 20
              }

              DEF EarthMaterial Material {
                     diffuseColor 0 0 1
                     specularColor 0.9 0.9 0.9  # a little more shiny
                     shininess 0.9       # Water is rather shiny
              }

              # Here's the definition for the Earth's texture map
              # As you can see, the definition is very straightforward
              # Just a filename

              DEF Surface Texture2 {
                      filename "WORLDMAP.RGB"
              }
[...]
Advanced Enhancements - Building Shapes
So far, we've been using only predefined shapes, like
Sphere, Cone, Cube,
and Cylinder. Sometimes this might be enough, but for
creating more complex and realistic scenes one needs the possibility to create
objects of whatever shape he likes.
In VRML every surface is composed of polygons, and these polygons
are defined as a set of points, grouped together to create a surface.
[...]
         # The Coordinate3 node gives a list of points

         Coordinate3 {
             point [
                     1.0 -1.0  1.0, # Point Zero
                     1.0 -1.0 -1.0, # Point One
                    -1.0 -1.0 -1.0, # Point Two
                    -1.0 -1.0  1.0, # Point Three
                     ....]
         }

         # Each line defines a triangular polygon
         # The definition of each polygon ends with -1

         IndexedFaceSet {
             coordIndex [
                  2, 1, 0, -1, # Polygon composed of Points 2, 1, and 0
                  2, 0, 3, -1, # Polygon composed of Points 2, 0, and 3
                  ...]
         }
[...]
The Sphere, Cube, and
Cone nodes are all converted to polymeshes
by the VRML Browser befor they are renderd to the display.
Advanced Enhancements - Using USE
When we are creating complex shapes in VRML files,
as shown above, their definitions take up lots
of room, and lots of download time. Normal complex
objects will have hundrets of points, and hundrets of
polygons using this points, so this will be a very long
code!
It would be nicer if one could define a complex object
ones, and then use it again and again by just referencing
it. In VRML this is also possible.
[...]

DEF ComplexObject Separator {

      # here comes Coordinate3 and IndexedFaceSet....
      [...]
}

Translation {
      translation 1 2 3
}

# use another complex object

USE ComplexObject

# and once again with other material

Translation {
      translation 2 2 2
}
Material {
     emissiveColor 1.0 1.0 1.0
}
USE ComplexObject

[...]
![]()
![]()
![]()