 |
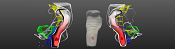
PelVis
|
|
PelVis
|
The Total Mesorectal Excision (TME) is the standard surgical treatment in case of any rectal malignancies (i.e. more commonly known simply as tumor). As the name already indicates, the procedure implies a removal of the complete fatty lymphovascular tissue encasing the rectum, which makes it a very delicate surgery. Not only is the survival rate a crucial issue, but also a lot of potential adverse effects need to be taken into account. The autonomic nerve passes just by the mesorectum. Damage to it can result in urinal and fecal incontinence and sexual dysfunction. To the benefit of all involved parties, those side effects are better to be avoided. Hence it is of utmost importance that the surgeon has precise information about where exactly that nerve passes along the mesorectum before cutting the patient open. There is a need for proper surgical planning. Currently this planning only consists of the investigation of pre-operative MRI scan of the patient. The autonomic nerves are not even visible in such scans. Moreover the MRI scans consist of a lot of single slices. One can imagine how accurate single 2D slices convey a correct 3D impression of the actual patients anatomy.
This is were PelVis will support the users to get an better understanding of the anatomy of the patient. It allows the user to distinct better between the different important structures of the pelvic organs and the user is also able to interact with the provided model.
The interaction consists of a cutting and unfolding of the object of observation via a splitting plane, which can be positioned freely in any region of interest. The resulting 'exploded view' is similar to leafing through a book. The tumor however will be unaffected by the slicing, such that the tissue layers are unfolded upon it, the tissue is ' peeled' and the tumor can be inspected. For an intuitive visualization, PelVis provides different structures with different visualization techniques. Therefore surgically relevant structures where subdivided into three categories (context, target and risk) and requirements where stated, f.e. one major requirement being, that for a surgical planning the target structure should never be occluded completely by any surrounding tissue. Out of the requirements the visualization techniques shown in section Structures Structures were used.
To use PelVis just start-up the provided executable (download). Since we only have one dataset which can be used this dataset will be loaded automatically. If PelVis is started up following will be visualized to the user:
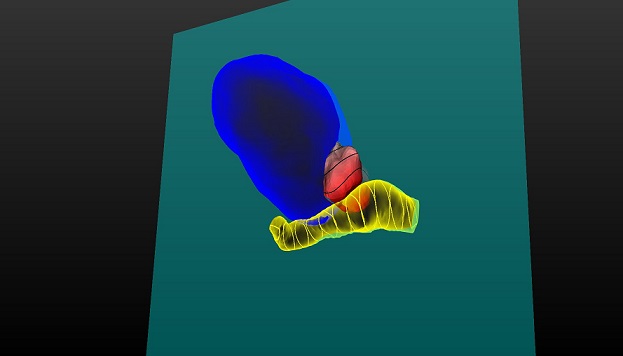
This view includes all different structures with their corresponding visualization technique, which will be explained in more detail in the next section. This view also contains a plane, which shows the user where the objects will be cut for the exploded view. The object can be rotated in any direction if the mouse is moved in the corresponding direction while holding the left mouse button. The zoom can be adjusted with the mouse wheel or by holding the right mouse button and moving the mouse up / down. It is also possible for the user to change the location and orientation of the cutting plane. This can be done by moving the object and then pressing the button 's'. This reorientates the cutting plane parallel to the view plane of the current position of the camera and the origin of the plane is set to the centre of mass of the object. The origin of the plane can also be moved along the direction of the current normal vector of the plane in case the user wants to cut the object outside of the centre. One example of such an exploded view is shown in the following image:

The main goal of PelVis besides the exploded view is the visualization of the different structures in the body. PelVis distinguish between three different types of structures: context-, risk- and target-structures. The visualization of these structures is shown below:
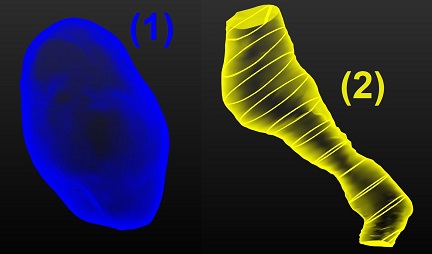
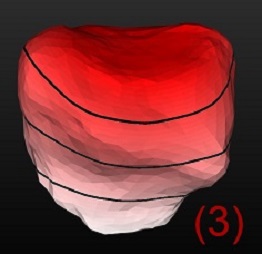
For these structures following visualization techniques are use:
Context (1): ghosted view + hatching,
Risk (2): ghosted View and contour bands for height information,
Target(3): distance fields with colormap and isolines
As seen in section Usage Usage the visualization differs only for the target structure between the exploded view and the normal view. For the exploded view the target structure is shown two times: one time not splitted and without a colormap, but with isolines, and the other time splitted and with a color map but without the isolines. This should enable the user an impression of how the target structure could be processed.
The source code can be found Files section on this website or the provides src directory. The most important files are the MyRenderer and the different shader. The documentation of the code can be found in the remaining sections of this website and also in the provided binary.
PelVis: Atlas-based Surgical Planning for Oncological Pelvic Surgery
 1.8.15