|
ComputerGraphik TU WIEN
|
|
ComputerGraphik TU WIEN
|
The project was done for the course Visualisierung 2 VU - MSC.
As current hardware allows people to utilize high-resolution displays that can portray a variety of small objects within a game or a visual simulation it becomes more and more difficult to select the elements via a mouse in such applications. It is a comprehensible thought to try to simplify the selection of small elements via adapting the speed of the mouse movement. The included user study confirms higher accuracy when semantic 3D pointing is used. The technique utilizes the information about the location and size of possible targets in the scene and their distance to the current cursor position in order to adapt the speed of mouse movement.
The implementation sticks very close to the suggested method which was described in the paper but we also implemented an alternative solution. The idea in the paper was to calculate the distance of the nearest object to the mouse position using a spacial hierarchy data structure, a QuadTree to be precise. Every pickable object is rendered into a Id Buffer that is a separate texture in our case. The result is a screen space representation of all pickable objects. The task is now to determine the nearest pixel to the mouse that is nonzero, meaning it lies on the nearest pickable object. The paper suggests to represent the whole screen space texture in a quadtree and then query the quadtree for the distance information. In addition to using a quadtree, we also implemented a compute shader that calculates the distance on the GPU. The compute shader outperforms the quadtree approach. Please read the following sections for a more detailed describtion of our implemented methods.
The purpose of the class MouseSemantics is to
The draw method uses point sprites to render the picture of a mouse pointer onto the screen. The size of the cursor is then directly coupled to the distance of the nearest pickable object. The bigger the distance, the bigger the mouse will be rendered.
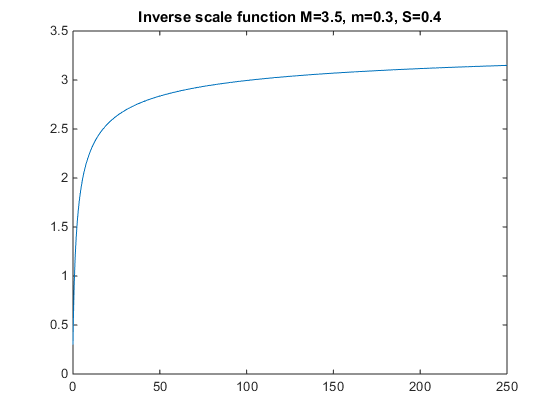
In addition to rendering, this class also implements the 2 scale functions which are presented in the paper. Important parameters are:
Standard scale function: (M - m) * (C / D) + M
Inverse scale function: (m - M) / (D + 1)^S + M where D is the actual distance to the nearest object and S is an empirically derived constant (0.1 in our case).
Using F10 one can toggle between the inverse and the standard scale function. Using J and K one can slow down or speed up the overall mouse speed.
The scale functions are depicted as follows:

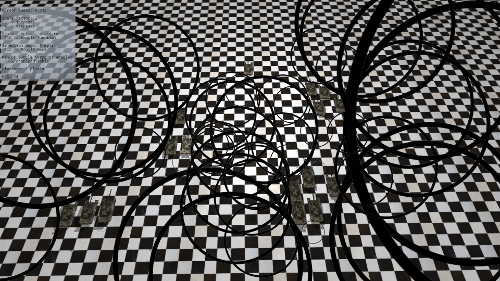
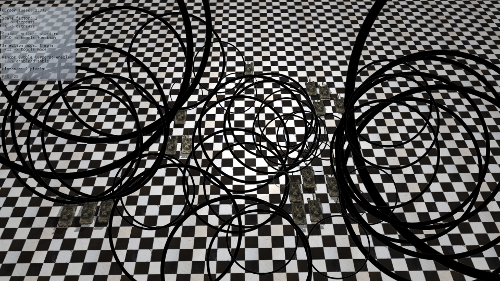
The class BubbleCursor implements the rendering of circles (=bubbles in the paper) that are randomly placed on the screen with the radius as big as the distance to the nearest object.
In the method generateRandomPopulation() 50 points are generated at random that are distributed across the screen space. These 2d points are generated using two Gaussian distributions centered at windowWidth/2 and windowHeight/2 (middle of the screen), with a sigma value of windowWidth/5 and windowHeight/5. The objects used were:
for further details see the function generateRandomPopulation().
In the draw() function the positions of those points are then forwarded to the pickObject method in the class SelectorQuadTree where the distance to the closest object (for each point separately) is computed. A point sprite renderer is then used to draw a transparent circle onto the screen. The radius of the circle is scaled to conicide with the distance to the nearest object (in pixels).
The user can enable/disable the display of these bubbles with the key B, everytime the display of the bubbles is disabled and enabled another random population is created. Rendering all bubbles consumes a huge amount of CPU load since for each of the 50 points the quadtree needs to be queried.
The result looks like:
The SelectorQuadTree class implements a quadtree based approach based on http://dl.acm.org/citation.cfm?id=1375714.1375755 . In the scene there are objects that can be selected. These objects are rendered, in screen space, into a texture, which holds the semantic information. The datatype of this texture is 16bit integer, to store the render id of the objects. After rendering with the draw() function, the quadtree is built up by the update() function. In the first step, the complete texture is copied from GPU to CPU. Then each pixel, which contains an object id, is used to build up a quadtree. The quadtree is selected to be a fix size of 2048*2048 pixels. The SelectorQuadTree::Node objects store the childs as indices of the SelectorQuadTree::nodes vector container. The tree is built up from top to bottom, where an occupied pixel will be present in the bottom level. The following pseudocode demonstrates the build up process:
Since the scene contains only static objects, it is sufficient to build up the tree only when the camera is moved. The quadtree then enables the fast selection of these static objects using the pickObject() function. The following pseudocode demonstrates the travelsal of the quadtree:
The SelectorGPU class implements an alternative selection method. The selectable objects are rendered into a texture the same way as in the quadtree based method. After rendering a compute shader is executed on the texture, returning the id and the distance of the closest object to the mouse. This way memory transfer and cpu time can be saved. By selecting different count of kernels, the size of the screen ROI can be modified. The following pseudocode demonstrates the object selection by the compute shader:
In this subsection, the results of the different selector algorithms are compared. The SelectorSimple was written to compare it's speed with the SelectorQuadTree::update(). It must be noted, that these tests were done separate from the main render loop and each function was executed 100 times. The SelectorGPU seems to be faster by this table then the SelectorSimple, but when running in the main loop in this application, there are more processing done on the GPU then on the CPU, it is slower with window size 256 x 256. For static objects the SelectorQuadTree has an impressive speed increase. The first table shows the speed results of the different functions separate from the rendering loop, the second table shows speed results of the selection methods in the rendering loop.
The implementation was tested on the following configuration: Intel Core i7-4700HQ 2.40 GHz * 4, RAM 8 GB, NVIDIA GTX 860M.
| Pixel Count | 256 x 256 | 512 x 512 | 1024 x 512 | 1920 x 1080(*) / 2048 x 1024(**) | ||||||||
|---|---|---|---|---|---|---|---|---|---|---|---|---|
| Time | Min (ms) | Avg (ms) | Max (ms) | Min (ms) | Avg (ms) | Max (ms) | Min (ms) | Avg (ms) | Max (ms) | Min (ms) | Avg (ms) | Max (ms) |
| SelectorSimple::pickObject() ** | 0.496078 | 0.578992 | 4.31417 | 0.710333 | 0.806508 | 4.38345 | 0.957944 | 1.055110 | 4.64175 | 2.066840 | 2.197720 | 6.86467 |
| SelectorQuadTree::update() * | 0.162508 | 0.176214 | 0.809546 | 0.620951 | 0.668921 | 2.419660 | 0.972053 | 1.031520 | 3.057290 | 4.439880 | 4.952960 | 12.06710 |
| SelectorQuadTree::pickObject() * | 0.087241 | 0.0921123 | 0.1552380 | 0.072701 | 0.0756049 | 0.0957944 | 0.183891 | 0.1924740 | 0.2416240 | 0.137704 | 0.1419980 | 0.2065570 |
| SelectorGPU::pickObject() ** | 0.0474696 | 0.053632 | 0.189451 | 0.0679969 | 0.0857317 | 0.41183 | 0.104347 | 0.140283 | 0.455879 | 0.32801 | 0.346553 | 0.488808 |
| SelectorBase::draw() * | N/A | N/A | N/A | N/A | N/A | N/A | N/A | N/A | N/A | 0.0372059 | 0.0443006 | 0.217248 |
| glGetTexture() ** | 0.0115466 | 0.0130007 | 0.0534567 | 0.0363506 | 0.0380997 | 0.168496 | 0.0684246 | 0.0744374 | 0.34084 | 0.472985 | 0.520775 | 1.6037 |
| Pixel Count | 256 x 256 | 512 x 512 | 1024 x 512 | 1920 x 1080(*) / 2048 x 1024(**) |
|---|---|---|---|---|
| Frames | Avg (FPS) | Avg (FPS) | Avg (FPS) | Avg (FPS) |
| SelectorSimple::pickObject() ** | 220 | 210 | 210 | 180 |
| SelectorQuadTree::pickObject() * | 256 | 256 | 256 | 256 |
| SelectorGPU::pickObject() ** | 210 | 205 | 205 | 198 |
The project was done for the course Echtzeitgraphik VU - MSC.
The project was to create a real-time animation with effects using at least OpenGL 3.3. In the demo scene, there is a tank placed in a museum room. The tank is moving forward and leaves a trail behind, here the ParticleSystemCPU is used. The Tank shoots bullets in 360 degrees. These bullets are moved by the ParticleSystemGPU and rendered using tessellated spheres with LOD and animation using displacement mapping with Tessellation. While the tank and it's effects are shown, Omni Direction Shadow Mapping is used. Afterwards, the shadows are rendered using Shadow Volumes. Then the Cube Mapping effect can be seen on the ellipsoid. Finally, the camera will look outside of the room showing the Volumetric Lighting effect. Before the demo is finished, the shadow of the tank is shown once more using Shadow Volumes.
The demo can be started in full screen mode in 1920 * 1080 with 60Hz refresh rate by double clicking on the exe. If it is started from command line, it must be started from the bin directory. In this case arguments can be used in the following format: 1920(w) 1080(h) 60(r) 0(windowed).
The shader and texture folders are placed next to the bin folder in the zip file. The exe finds files using the following structure:
Controls:
The project was done for the course Computergraphik UE - BSC.
The project was to write a game, with effects using OpenGL 3.3. The game can be started in full screen mode with 60Hz refresh rate by double clicking on the exe. The resolution is always 800 * 600. If it is started from command line, it must be started from the bin directory. In this case a dummy argument like {windowed} can be used to start in windowed mode. The game is only a two-player version, but the algorithm can handle any number of player. The shader and texture folder are placed next to the bin folder. The exe finds files using the following structure:
The game is a turn-based artillery strategy game, with ShadowMap and ParticleSystemCPU effects. In one turn only one tank can be moved. A turn ends in one minute or when the bullet reaches the terrain. After the bullet is shot, the tank can not move. A bullet can be shot by holding the SPACE key. The longer it is hold the bigger power it will be used to shoot. There is water under and above the track. If a tank reaches water it's health will decrease. If a tank goes off track it dies. When only one tank lives, the game ends and the result is written out in the console. The user inputs are handled by the GLFW library. The camera can be moved either with the keyboard or with the mouse. The keyboard controls are the arrows for moving and 1 to zoom out and 2 to zoom in. The right mouse button can be used to move the camera, the left mouse button can be used to rotate the camera and the middle mouse button is to zoom. A tank can be moved with the WASD buttons. The turret and the gun can be moved by the IJKL buttons. A bullet can be shot with the SPACE button, the power of the shoot depends on the amount of SPACE. A turn can be ended with the ENTER key. The ESC key can be used to exit the game.
 1.8.9.1

