User documentation
Basics
Before you can start working, you need to load a dataset. Go to File -> Open and select a file to open (it should conform to the the VisLU specification).
Transfer functions
The transfer function enables coloring of both slices and volumetric data. On the upper part of the transfer function widget, a histogram of intensities is shown. There, alpha values for each intensity can be set. To change the alpha function, left click to add a new control point, click and drag to move the control point, and right click to delete a control point.
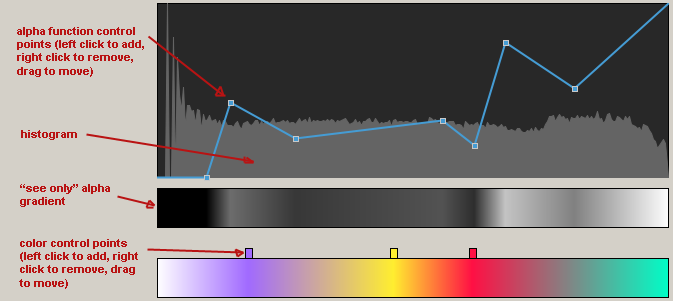
Under the histogram, an initially white stripe is present. Click on it to add new color control points. Click and drag to move those control points around, right click to delete those control points. Using the color control points, you can create gradients for various intensities.
The transfer function can be saved and loaded using the drop down menu on top (Transfer -> Load Transfer Function / Save Transfer Function).
Slicing
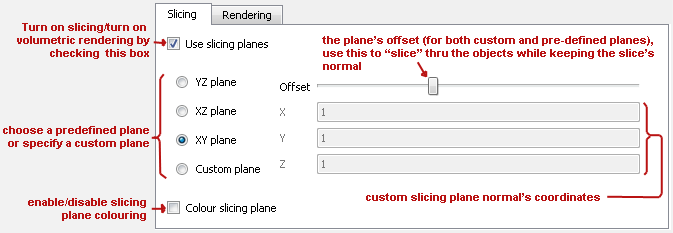
To enable the slicing mode, tick the "Use slicing planes" checkbox. After that, select one of the main planes or enter a custom plane using it's normal's coordinates. Translate the plane along it's normal using the offset slider in the upper right corner of the widget. You can also enable slice coloring by ticking the "Colour slicing planes" checkbox. The slices are zoomed to fill the current viewport, no user adjustment of zoom level is currently possible.
Volume rendering
A volume visualisation of the dataset can be viewed when the "Use slicing planes" checkbox is unchecked. The transfer function is automatically applied to the volumetric visualisation.
Click and drag using the left mouse button to rotate the camera around the visualised object (the point under the mouse should remain ROUGHLY the same during the dragging). Click and drag using the right mouse button to move the camera's center of rotation away from the dataset's center (note that this isn't as intuitive as we've hoped, as it makes any further rotations look awkward). You will only be allowed to move a certain distance from the dataset's center. You can reset the camera from the drop-down menu using Camera -> Reset
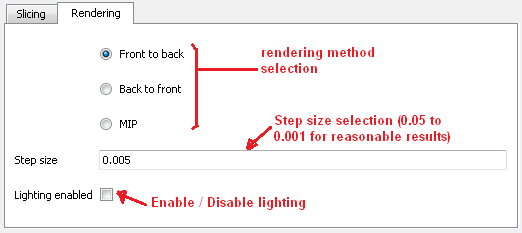
You can set the algorithm to use (back-to-front - slower, front-to-back - faster, MIP - doesn't work correctly) and the step size for the ray-marching algorithm in the Rendering tab. Also, lighting can be enabled and disabled.