|
Treelike
v1.0
|


|
|
Treelike
v1.0
|
|
This project is an implementation of the paper Parameterization and Feature Extraction for the Visualization of Tree-like Structures [Lichtenberg et al. 2018]. The main contribution of this paper is a method to automatically generate u- and v-parametrisations for a tree-like, tubular mesh, for example a mesh of blood vessels or bronchial structures.
Very tensely summarizing, end-points and a root point of the mesh are detected by iterative skeletonisation, and the u-coordinates are calculated from the mesh geometry (curvature, geodesic distances) and this root point. The v-coordinate is based on the current screen-projection of the mesh and is recalculated per frame. U stretches along the vessel structure, from the root point towards the end points. V stretches from the contour towards the centre of a vessel.
This parameterisation can then be used for various visualisation techniques, like iso-lines, colour-coding, drawing decals or hatching.
The program display consists of two parts: The viewer and the control window (GUI), as shown in this image.
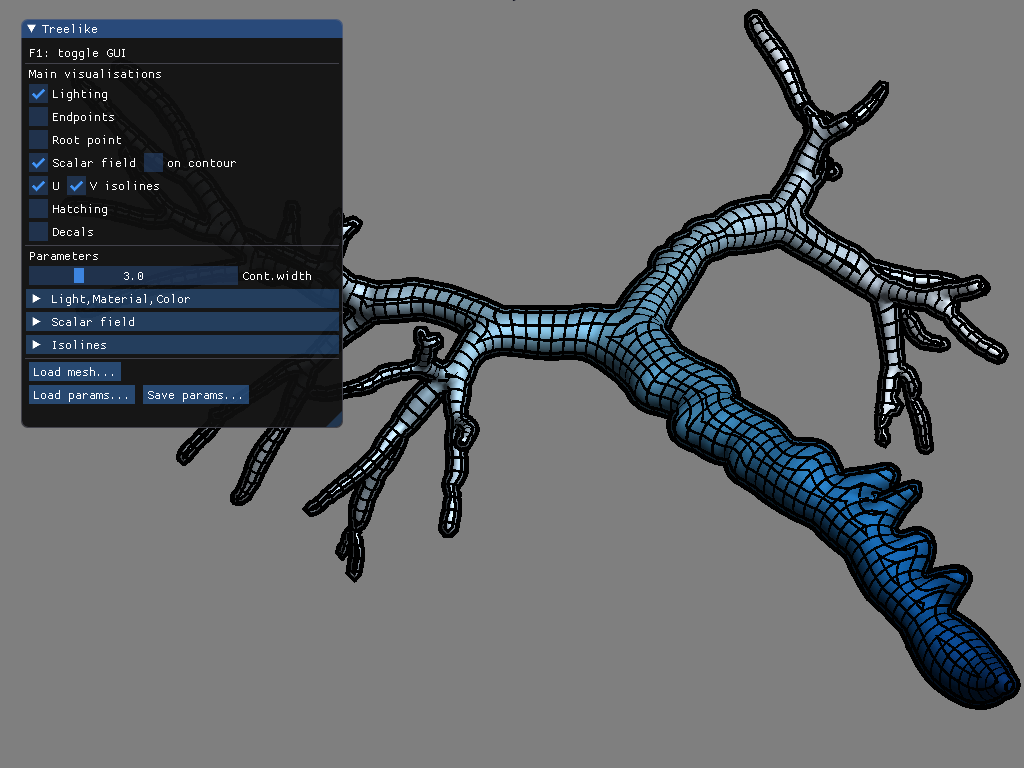
In the viewer, the currently selected mesh visualisation is drawn. The camera is implemented in an arc-ball style: Holding the left mouse button while moving the mouse rotates the camera around the mesh. Holding the middle or right mouse button while moving pans. The scroll wheel is used to control the camera's distance (zoom).
The GUI allows to select different visualisation techniques (also in combination), and to modify the parameters for each technique. It also allows to load a different mesh. Furthermore, the current parameter settings can be loaded and saved from/to a file. Pressing the F1 key hides/shows the GUI.
The top section of the GUI, labelled "Main visualisations", is used to select the currently active combination of techniques. Some of the techniques have additional parameters; these are accessible below, in the section "Parameters", when the respective technique is active.
Toggles between Blinn/Phong lighting and a plain-coloured mesh. While this is not a separate technique per se, turning off lighting can change the overall impression of other visualisations, most prominently hatching.
Parameters ("Light,Material,Color"):
Parameters ("Light,Material,Color"):
This is a colour-code visualisation of the U-parametrisation, i.e., the distance from the root point. The checkbox on contour selects whether the colour-coding is applied to the mesh itself or its contour.
Parameters:
In this visualisation, iso-lines, i.e. lines marking equal parametrisation values, can be drawn for the U- and V-parametrisation separately or combined.
Parameters:
This visualisation generates hatching strokes solely based on the U- and V-parametrisation (contrary to traditional hatching methods which usually employ textures).
Note: Hatching typically looks better if lighting is disabled, as the main purpose of hatching strokes is to provide a hand-drawn appearance.
Parameters:
This allows to draw decals, like arrows, on either the mesh or the contour (controlled with the checkbox on contour).
Parameters:
Pressing the button "Load mesh..." shows a file dialogue, where a mesh file in .obj or .off format can be selected. Subsequently the endpoints and U-parametrisation are calculated (this can take a couple of seconds) and the mesh is displayed.
WARNING: The method of the implemented paper relies on meshes being watertight and manifold.
If the loaded mesh does not fulfil these properties, the outcome will be erroneous at best, or the program can even crash (due to unstable behaviour of one of the used external libraries in that case).
A typical problem of vessel-meshes found on the Internet is that they are often combined from overlapping sub-meshes. Combining these into single connected mesh can be very tedious and error-prone.
The loaded mesh should also have not much more than 10.000 vertices; if it does, it will either take a very long time to calculate the parametrisation, or fail during skeletonisation.
For these reasons, pre-processing of meshes is almost always necessary.
Three example meshes are included and pre-processed as well as possible.
The current parameter settings can be saved to or loaded from a file. Use the buttons "Load params..." and "Save params..." for that task.
Note: All the GUI settings are saved, except the currently loaded mesh and the camera position.
The binary and source code can be downloaded here:
 1.8.18