© Martina Rasch, Thomas Weiner, TimeNets Help, 2014, TU Wien
Time Nets Online Help
Martina Rasch & Thomas Weiner
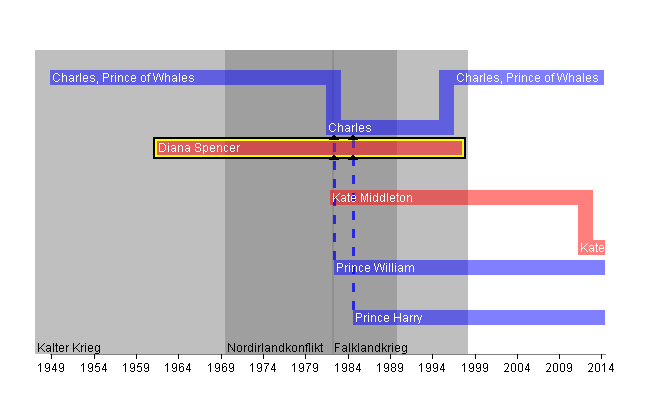

This tool is intended to support genealogists in doing their job. It uses a visualization technology
called TimeNets to display the content of a family tree. This approach has several advantages
over traditional family trees. The most important advantage is however, that each person’s life
is displayed as life line which starts at birth time and ends at the date of death. This allows
displaying the time on a constant (x)-axis which helps genealogists in comparing peoples
lifetimes, which is a recurrent task.
The TimeNets-Tool is straight-forward to use.
To start, load a database, provided in the DB subfolder.
This will result in a first view of the TimeNet.
You can interact with the TimeNet by clicking on a person making it the new focus person.
This will cause the TimeNet to recalculate.
Eventually you will see some new persons or you will loose some already displayed ones.
This comes due to the ”Degree Of Interest”-Values set by the 2 sliders at the right side.
When you move the “DOI Threshold” slider to the left, more and more ancestors will show-up.
When you move the “DOI Decrease Value” slider to the right less ancestors will show-up.
To be able to search for a specific person you can enter any part of this person’s name in the
“search”-textfield and hit “Go” afterwards.
When you want to control the ordering of the children, you can use the provided sorting
radio-buttons. The default ordering is “early children first”.
Further you can hover over a person to see special detail on that person like birth date,
eventually a death date when the person is already dead and a calculation of this persons age.
You can see annotations (white circles within a timeline) marked on certain persons.
When hovering these annotations you will be prompted with a tool-tip providing further
information about this annotation.
When you hover the gray areas in the background, which display long-term events, you will
see additional information (starting-dates, ending-dates, etc.) about these events.
Sometimes it is neccessary to save the displayed TimeNet as picture. Therefore we provided
the “Save Picture” button. Just click on it and the screen will be saved to a filename of your
choice.
Finally you can change opacity of the displayed TimeNet components to ensure best visual
results by moving the “Change Opacity” slider.
We hope you will enjoy using this brand new visualization tool which surely will simplify
your everyday genealogical investigations.
Time Nets
Go to the directories of TimeNets-Tool, TimeNets-Tool-Sources and documentation.