Visualisation Exercise 1

Download

Windows Binary: ue1.zip

The Software is written with Borland Delphi 2005

Manual

Software Installation

The Software is written for Windows 2000/XP and doesn't need any special setup. To start the program extract the ZIP-File and open ue1.exe.

Loading a dataset

To open a file click onto the button with the blue folder. The software is able to read 16-bit (12-bit used) and 8-bit file with a 6 byte header containing the X, Y, and Z-dimensions.

There are 3 fields to apply different scaling for the X,Y and Z axis. The scaling is only valid for the rendering mode Raycasting.

Viewing slices

To look at the raw slices select one of the 3 viewing directions with the radio button "Viewmode". To change the current slice drag the scrollbar.

It is also possible to apply a transfer function to the slices.

Viewmode Raycasting

With this viewmode it is possible to look at the dataset from any direction. To turn the dataset select the viewing angle with the 2 sliders "Turn X" and "Turn Z". It is also possible to enter a value into the fields or drag the dataset in the viewing window with the mouse.

The field resolution defines the rendering resoultion for the cube. A higher resulution delivers higher quality but also slows down the rendering. To get an early preview it is good to select "progressive refinement". The drawback of this option is also a slower rendering.

With the radiobox "rendering" it is possible to select different rendering modes.

averageEvery voxel contributes in the same way. The image looks like an X-Ray
maximum intensityOnly the voxel with the maximum intensity along the viewing ray is renderd
Levoy: nearest neighborThe nearest voxel contributes to the pixel according to the paper Display of Surfaces from Volume Data by Mary Levoy
Levoy: trilinear preshadeThe same as above but all surrounding voxels are classified and the resulting color/alpha is trilinear interpolated.
Levoy: trilinear postshadeThe same as above but the intensity of all surrounding voxels is trilinear interpolated and this value is classified to the corresponding color/alpha.

Transfer Function

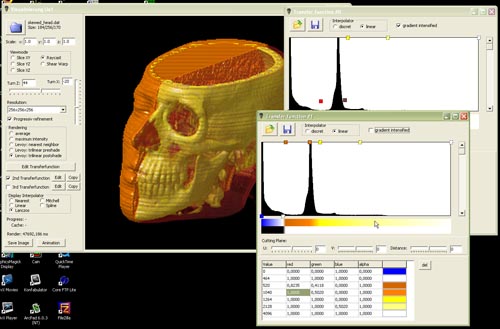
To open a transfer function editor hit the "Edit Transferfunction" button.

With the first two buttons it is possible to load and save the current transfer function. The interpolator defines the way to determine the colors between two points. The checkbox "gradient intensified" determines if the gradient of the dataset should be taken into account for the calculation of the alpha value.

To add a clasification point double click into the histogram. The default color is white. The height of the point determines the alpha. To change the color of point select the element and double click.

In the bottom of the window is a complete list of all clasification points with the exact values.

To delete a point select the line in the table or select the point in the histogram and hit the delete button.

Multible Transfer Functions

It is possible to define more than one transfer function and cut the dataset into different areas. To activate a second transfer function the checkbox "2nd Transferfunction" must be activated. The button "copy" copies the default transfer function. The button "Edit" opens another transfer function editor.

The sliders for U, V and Distance control the position of the cutting plane. U is the angel for the normal vector of the plane on the X axis, V on the Z axis. The distance value defines the distance from the center point.

Its also possible to define a 3rd transfer function. The default function has the lowest priority, the 3rd transfer function the highest.

Display Interpolator

The display interpolator defines the interpolation method for the upscaling to the screen resolution.

Anmation

It is possible to generate a sequence of images to create linear or Quicktime VR object movie. The animation can control with two paramters like the X and Z rotation or the cutting plane of the second transfer function. All images are stored as BMP with the given filepattern.

Samples

Quicktime VR - Objectmovies

To view the files you need Quicktime 5.0 or higher.
Name Resolution Size Horizontal Vertical Movie
Body 512x512 780 kB 24 1
Bonsai 256x256 5.2 MB 24 13
Head - Full 512x512 11.7 MB 24 13
Head - Effect 256x256 1.65 MB 18 9
Head - Gradient intensified 512x512 805 kB 36 1

Images

Head - average function Head - maximum intesity
Foot Skull - clipping plane and gradient intesified
Body with cutting plane Lobster with 2 clipping planes
Head with 2 clipping planes