Introduction
Melange is a Windows application demonstrating an implementation of a Focus+Context technique. Melange was developed as a lab exercise for the course Informationsvisualisierung at the Vienna University of Technology.
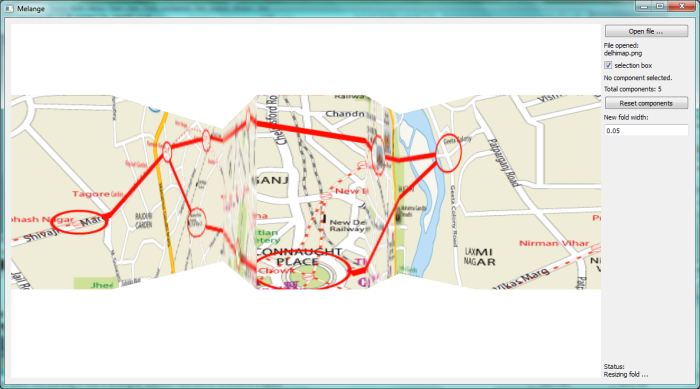
Usage: Upon starting the program, use the button labelled 'Open file ...' in the top right corner of the window to open an image file.
The image files included in this package are recommended for use with the program, since they have optimal dimensions.
The image is then placed onto a wide rectangle on the workspace. You can move the rectangle around (panning) using the Right Mouse Button
or bring it closer to the screen (zooming) using the Mouse Wheel.
The Left Mouse Button is used for manipulation of the folds. On click, a new fold is created at the position of the mouse cursor. With the
button held down, if you drag the mouse upwards, the area to the left and right of the fold is shifted 'into' it. The fold becomes deeper and the areas
next to the fold go into the fold. Conversely, by moving the mouse downwards you can make the fold shallower again as the picture comes out of the fold.
When the fold is made planar again, it is deleted.
The interface provides a number of tools to give you insight into the program's workings. When you move the mouse around the workspace, a selection marker
will highlight the component or fold you have selected in a light transparent blue color. At the bottom right of the window, a status message field provides
messages about what the program has currently been doing. Near the top right, some information fields provide technical details, such as into how many logical
components the workspace is split up right now, and the ID number of the currently selected component, if any.
Further interactivity is enabled through a 'reset components' button, which resets the workspace back into its initial state. This is useful if you have many
folds that you want to get rid of quickly without having to un-fold them all manually. Below that, a text field allows you to set the size of the next
fold that you create (in percent of the picture size).
Theory
The goal is to establish a Focus+Context technique which can show multiple focus areas at the same time. The 'naive' approach, that is, using multiple independent viewports, has some drawbacks that we would like to eliminate. Since the viewports are disconnected from one another, there is no more spatial relation between them, the user has to operate them independently and can only rarely make assumption about the distance or scale of the two focus regions. On the other hand, using only one viewport entails much zooming and panning back and forth between the focus regions to be able to operate on them both.
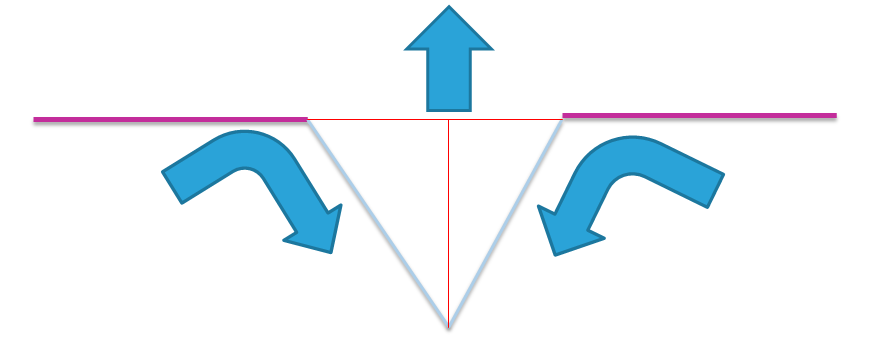
To alleviate these drawbacks, we use Folds. That is, we take the plane that represents the loaded picture and fold it inwards, such that the focus regions wander closer together as the context inbetween gets folded away. Using this approach has some properties that can be used to fix the shortcomings of the previously mentioned methods. Firstly, it is always possible to make multiple focus regions visible at the same time. The focus regions are translated when a fold is resized, therefore it is possible to move them close enough together to get them on one screen. Secondly, the context surrounding these focus regions is visible. We use linear folds, as opposed to folds that bend in some way, because this way the context right at the edge of the fold receives the most screen estate, which is often important, while also preserving the visibility of the part further in the back. Thirdly, since the focus regions are connected by what is between them, distance relations are being made visible. In fact, the depth of a fold is proportional to the distance between its two edges. While this can not easily be discerned with the naked eye, comparing two differently deep folds to each other becomes very efficient and can be done trivially. Finally, the folding represents a real-world metaphor, which are generally known for their user-friendliness. The real-world equivalent would be folding a piece of paper to bring the edges closer together. The technique is very accessible for and easily understood by the user.
Implementation
Many forms of user interaction have been tested, such as giving the user the ability to push one end of the working picture into the fold. Ultimately, however, we came to realize that the current system is the best. The controls are fold-centric. The mouse cursor position sets the position for a new fold, which is created on click using the width given by a text field in the UI (the user doesn't have to change it though since the default value is often good enough). By dragging the mouse, the user can resize the fold while the edges of the working picture come closer together and the content 'wanders' into the fold. This method gives the user immediate control over the folds and allows them to interactively experiment with their placement and content. There is no need for additional parameters or heuristics, as would be the case with different control schemes, and that makes this the most user-friendly.
Panning and zooming remain an integral addition to the folding operation. In fact, we chose not to include the regular zooming operation, in which the field of view is usually narrowed, since the perspective correction would destroy the information in the fold depth. Instead, we elected to simply move the working picture closer to the viewer when zooming. This way, the user can go very close to a deep fold and actually 'look into the fold' and read the information within as they would be able to do in the real world. This method extends the real-world metaphor concept even further.
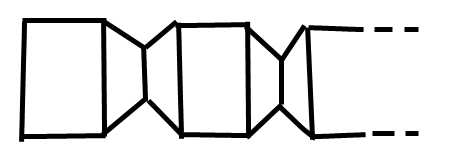
Technically, our system manages a chain of logical components to represent the working picture. We have two types of components, planes and folds. When a picture is loaded, it is mapped onto the working picture, which consists of a bounding box and one single plane component. All the components are in normalized (0,1)-space and are mapped into the world using the bounding box. When the user selects a plane component to insert a fold component, the plane is split into two and a new fold is inserted into its middle. The management system makes sure that the consecutive components are always linked and receive their correct mappings between world- and (0,1)-space. Therefore, a fold is always neighboured by two planes. When the user resizes a fold, all the components to its left and to its right are shifted towards or away from the fold. The management system transforms this operation into (0,1)-space such that it is ensured the fold stays on the same position on the screen while resizing. When a fold degenerates into a plane, the management system removes it and unites the two remaining neighbour planes into one.
Finally, the texture coordinates for the components are calculated using the euclidean distance between its two ends and
transformed using the working picture's original bounding box, before any scaling took place. The logic behind this is that the scaling
only has the effect that the surface is shifted backwards, but it still spans the same surface. Therefore, this method makes sure that
each component receives the amount of surface it encompasses as a texture coordinate. It is easy to see that it also ensures folds receive
more texture space than planes since they also extend into another dimension.
The system we implemented is very robust and extendable. The user may play around placing and resizing folds like crazy, break conditions and exceptions
will ensure that the underlying geometry remains correct. Furthermore, since the components system uses normalized (0,1)-coordinates
for geometric purposes, it will naturally scale to any changes made to the outlying program. In fact, the program could be easily extended
or modified without having to touch much of the system code. Though it far exceeded the aim of this project, a future project could be imagined
in which the system is extended to allow, for example, horizontal folds or cross-shaped folds, or to give the user some more interactivity with
the folds, like allowing them to resize a fold explicitly.
In any case, please have fun trying out the program and feel free to check out the source code.
Technical details
The graphical user interface was created with Qt.
Graphics rendering is done with a mixture of Qt and OpenGL.