Welcome to TreePlusSilverlight!
This is an implementation of the TreePlus algorithm using Microsoft Silverlight.
TreePlus is an interactive graph visualization system based on a tree-style layout. TreePlus transforms graphs into trees and shows the missing graph structure with visualization and interaction techniques. For example, TreePlus previews adjacent nodes, animates change of the tree structure, and gives visual hints about the graph structure.
You can find additional information about the algorithm, an example video and the original paper on the following webpage:
![]() TreePlus offical homepage
TreePlus offical homepage
In this section you will find information about our implementation, what's necessary to run it and how to use it.
Implementation
We implemented our TreePlus with Microsoft Silverlight 4, the .NET Framework 3.5 technology using Visual Studio 2010 Professional. Given the dynamic nature of the algorithm (animations, highlighting, ...), Silverlight seemed to be the perfect choice, allowing us to do all these things with simple and short code. An OpenGL/DirectX implementation would have taken much more coding effort on parts that aren't crucial to the actual TreePlus algorithm. Using the .NET Framework and its provided class library we could concentrate on the integral parts of our TreePlus implementation.
The Nodes inside the Canvas are arranged in Rows and Columns.
|
Our algorithm basically consists of four steps:
- Moving: Once you force a Node to expand by right-clicking on it, the algorithm checks to see if a Node in the Tree needs to be moved from one Node to another. This can be necessary since in a Graph a Node can be a child of more than one Node. In a tree however a Node can always only be the child of one parent Node. So Nodes that must be moved to become the child of the currently expanding Node are removed from their old parent and attached to the new one. They are placed at the top of the column where all child Nodes of the expanding Node are to be placed (the next column to the right of the expanding Node). This animation is the first step of the algorithm. Of course when no Node needs to be moved, the algorithm starts at the next step.
- Expansion: In this step, all new Nodes (Invisible adjacent Nodes) are created at the position of their parent Node (the Node you right-clicked), and moved by an animation to the top of the next column (right of the parent's column).
- Collapsing: The next step is the collapsing of the tree. This is done to compact the tree and close any holes in the tree that could have been created by the Moving step.
- Explosion: The last step explodes the tree. Since in the Expansion step all new Nodes where moved to the top of the column where they belong, it is most likely that some of these Nodes now overlap each other, and we only see the top-most Node. The explosion step fixes this by moving overlapping Nodes down iteratively to their new position. When doing so it sorts the exploded Nodes in a way, that reflects the ordering of all the expanded Nodes in previous column.
Required Components
In order to run the software you need the following components installed:
- Windows XP or above, Mac OS X or above
- Silverlight compatible browser: latest versions of Internet Explorer, Firefox, Safari
- Microsoft Silverlight 4 Runtime or above: You can grab the current version
 here
here - Microsoft .NET Framework 3.5 SP1 Runtime or above: Grab the current version
here
Since Silverlight is a web-application and we expect you do not want to host it inside an actual IIS webserver, we suggest you simply start it from inside Visual Studio 2010. In order for this to work, you need to have the following Tools installed:
- Visual Studio 2010 incl. Service Pack 1
- Silverlight 4 Tools or above
- Silverlight 4 SDK or above
- Optional: If you want to debug it, you need to get the Silverlight Developer Runtime
Also make sure you are always using the same version of the various Silverlight requirements mentioned above. So if you are installing the Silverlight 5 Tools, make sure that you are also installing the Silverlight 5 SDK as well as the Silverlight 5 (Developer) Runtime. Mixing these tools is not recommended.
Run the example from a preinstalled webpage
You can find an up and running version under the following link:
![]() TreePlusSilverlight webpage
TreePlusSilverlight webpage
Running the example from Visual Studio
Open up Visual Studio and load the TreePlusSilverlight solution. If everything is installed correctly you should be able to simply run the demo by pressing F5 or using the menu "Debug" -> "Start (without) Debugging".
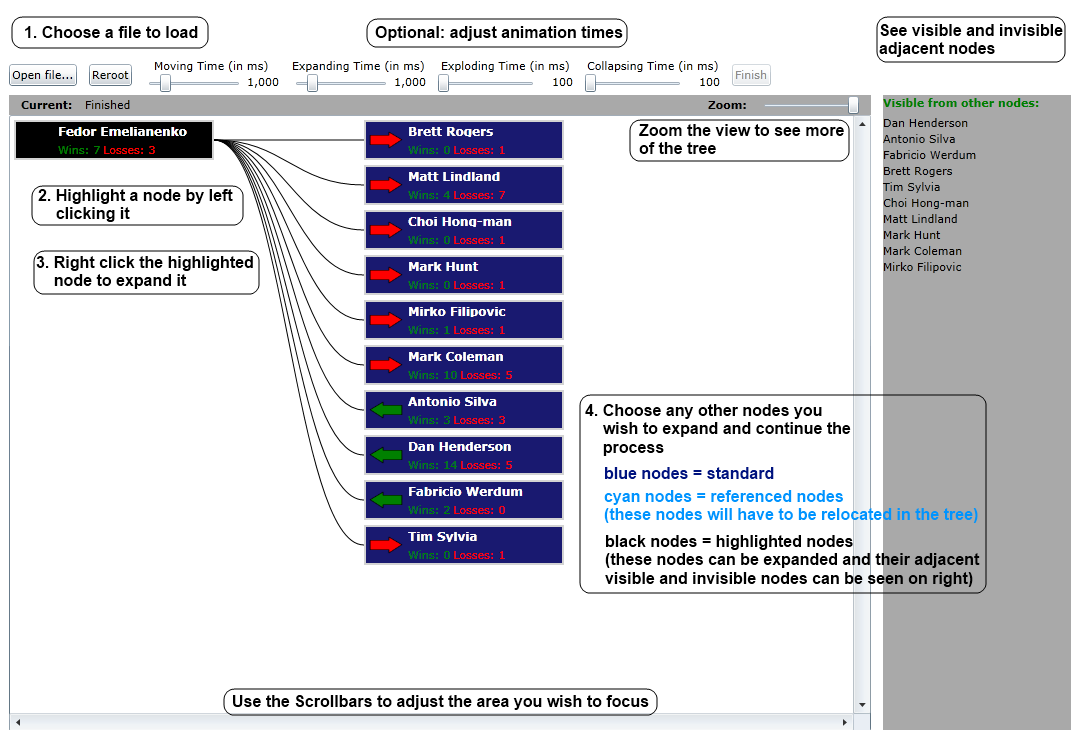
In the above image you can see the basic workflow when using TreePlusSilverlight. Lets outline the steps to get you started:
- Click on the "Open file..." button and choose one of the provided "scorecard.dat" files.
- When the loading process finishes, you should see one Node inside the Canvas. This is the root node. If you left-click it with your Mouse you select the Node (it changes its color to black) and the right part of the screen refreshes. This shows you all of the adjacent Nodes of the selected Node and their current status: Either they are already visible inside the Canvas or they are invisible.
- When you right-click the selected Node you will force it to expand all of its invisible Nodes.
- You can then continue to expand other Nodes by repeating these steps.
GUI Interface
At the top of the screen you have the control area. This is where you can control what and how the content is presented to you.
- Open File...: Loads a new Graph from a file.
- Reroot: Allows you to reroot the tree to the currently selected Node.
- Sliders: The four sliders at the top of the screen allow you to control the animation speed of the different animation steps when the tree transforms.
- Finish: When an animation gets stuck, you can force it to finish using this button.
Below the control area is the Canvas. At the top of the Canvas you have a status bar that shows the currently active action. To the right of the status bar is a Zoom-Slider, that allows you to zoom-out the view to see a larger area of the tree. The Canvas is surrounded by Scrollbars that let you change the area of the tree you wish to focus.
On the right side of screen is the Adjacent-Nodes-View. This view gets updated on selection or expansion of a Node and shows all the Nodes are currently visible or invisible in the Canvas. Visible Nodes will be most likely be relocated, while invisible Nodes will get expanded on Expansion.
Here you can also perform a Search in the Tree. Searches are started by pressing Enter. However you need to know the fullname of the Node you wish to search for, otherwise the Node will not be found. If the Node is found, it is either highlighted (in gray) if it is already expanded, or an expansion order is shown, that tells you what Nodes you need to expand in order to get to the searched Node.
Nodes
As you will see throughout your exploration of the tree, there are three types of colored Nodes, everyone of which has a different meaning:
- blue: this is the standard color of a Node.
- black: a selected Node. Such a Node shows its adjacent parts in the right part of the screen and can possibly be expanded.
- cyan: a referenced Node. A Node is a referenced Node if it is an adjacent Node of the currently selected Node but also the child of another Node besides the selected one. Such a Node will have to be relocated in the Tree once the selected Node will be expanded. Therefore it has to be removed from its old Parent and attached to the currently selected Node.
Troubleshooting
In this section we will outline known Issues with the project and how you can solve or circumvent them:
- Animation does not finish: Sometimes the animation does not finish. In this case the Statusbar at the top of the Canvas shows an action like "Exploding..." but seems to be stuck. If you see that there is no animation going on it probably really isn't. You can then use the Button Finish on the top-right side of the control area to force the tranisition of the tree to finish. This will draw the connection lines and set the status to finished so you can again continue with expanding the tree.
- Wrong node order/intersecting lines: Usually our TreePlus algorithm should sort items in a way that no connecting lines intersect each other. In rare cases however, the algorithm does not correctly detect the need to sort a Node differently. If this happens you can mostly force an accurate re-sorting by re-expanding (just right-click on an already expanded Node again) one of the top Nodes that has intersecting lines.