Introduction to TreePlus
Graph Visualization is a part of Visual Analytics and is frequently used to explore complex
relationships. A clearly arranged and effective graph layout, including interaction in
realtime is usually difficult to achieve. In such a scenario, nodes often lie too close together or overlap each other. Furthermore, edges between nodes (representing relationships) frequently cross and node labels
are ignored for better presentation.
The authors of the paper "TreePlus: Interactive Exploration of Networks with
Enhanced Tree Layouts." describe an alternative method to visualize a graph and to overcome these
disadvantages. Thereby a tree structure is used to visualize the graph. The user starts with
a node and incrementally creates a tree out of the graph. The complexity is reduced with this
method. Moreover this approach is well suited for detailed graph exploration, where node labels
must be read quickly to interpret the relationships.
TreePlus implements such a graph exploration tool based on the paper "TreePlus: Interactive Exploration of Networks with
Enhanced Tree Layouts." The tool was developed with C++, the QT-SDK and Visual Studio.
The application window is devided into the menu bar and two viewport areas. The "Tree Layout Window" on the left hand side is the main area which allows fors interactive navigation and exploration of the graph data. The "Preview Window" on the right hand side updates and displays adjacency relations. Colors and behavior mentioned in the rest of the document refer to the predefined settings, alterable in the "File/Settings" dialog window.
- The File Menu
The entries found in this menu are "Open", "Settings" and "Exit". Pretty self-explanatory they allow for opening a new dataset in GraphML data format, changing predefined application colors and behavior and closing the application.
- The Tree layout Window
In this area, navigation and exploration is facilitated by interaction with the mouse. Specifically "LMB CLICK AND DRAG" pans the scene and "RMB CLICK AND DRAG" zooms the scene. "LMB CLICK" and "LMB DOUBLE CLICK" atop a node result in exploration and expansion further described in the "workflow" section below.
- The Preview Window
This area presents the list of adjacent nodes of the currently selected ("explored") node.
If the list is too long to fit in the window the cursor indicates scrolling facility by changing its shape.
- Settings
This semi-modal dialog allows for changing predefined application colors and behavior.
Changes are applied immediately by hitting "Apply" or "OK".
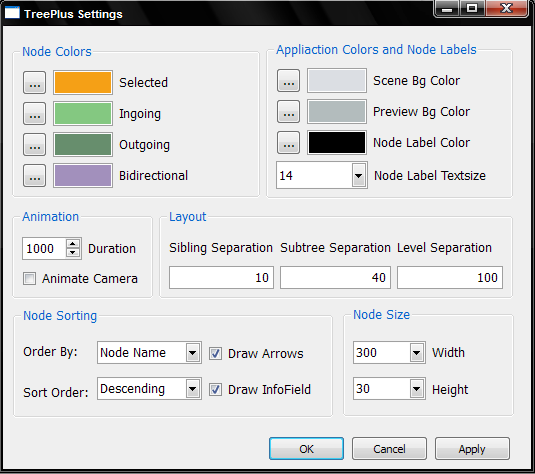
- Node Colors
Use these settings to change the semantic node color-coding.
- Application Colors and Node Labels
Use the node label text size in conjunction with the node width to compensate for long labels.
- Animation
Toggle automatic repositioning of the scene on and off and specify animation duration.
- Layout
Specify the tree layout spacing. Unit is "pixels".
- Node Sorting
Choose the sort attribute and sort order.
By ticking off the display of the info-field more space will be available for labeling.
- Node Size
Use the node label text size in conjunction with the node width to compensate for long labels.
Workflow
In this next section we show the functionality of the application with several screenshots of the workflow and explain the user interaction for each.
The window is split up into two areas. The larger left window is named "Tree Layout Window" and the right window is named "Preview Window" in the following section.
Node selection and Navigation
The selected node is displayed in an orange color. A single click with the left mouse button on a node changes the actual selected node.
Hold the left mouse button and move around to pan the tree in the "Tree Layout Window" or for scrolling in the "Preview Window".
Hold the right mouse button down and move the mouse to zoom in and out in the "Tree Layout Window".
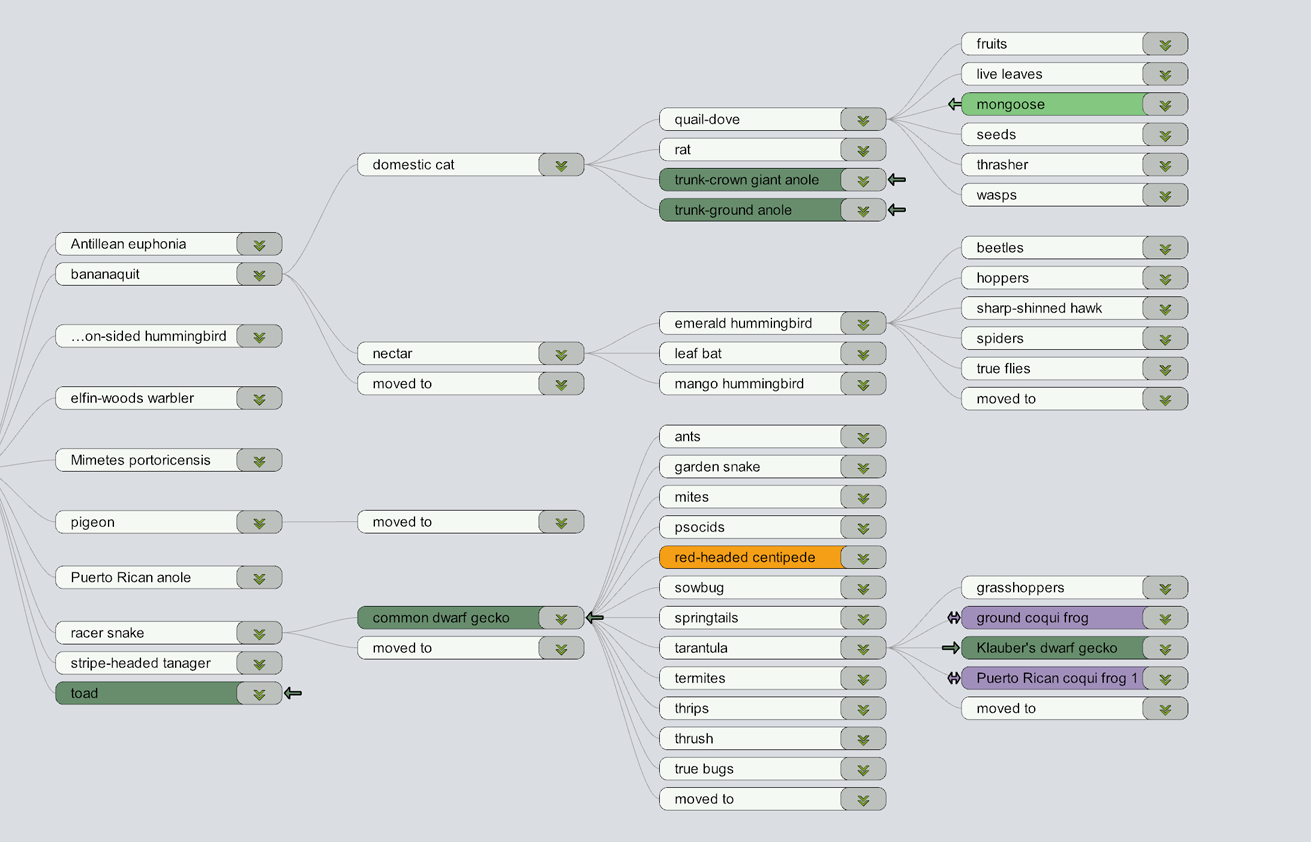
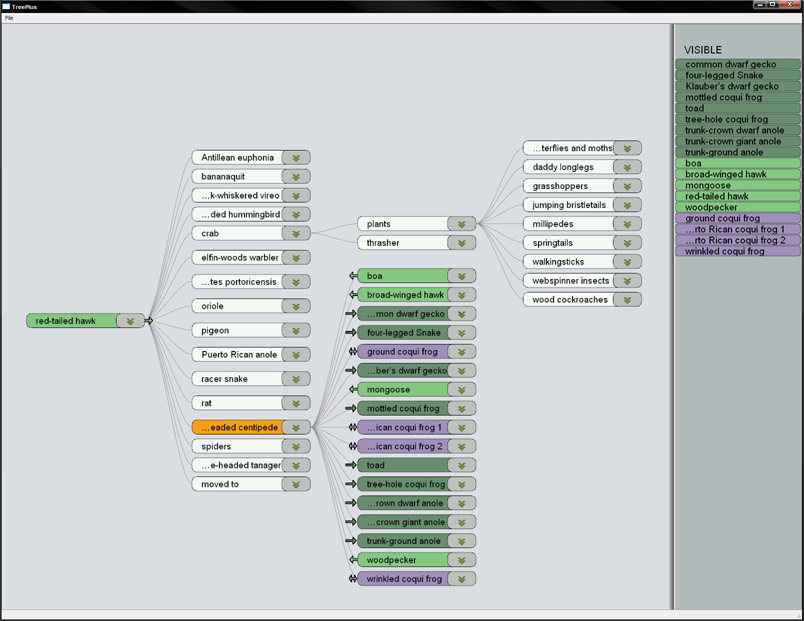
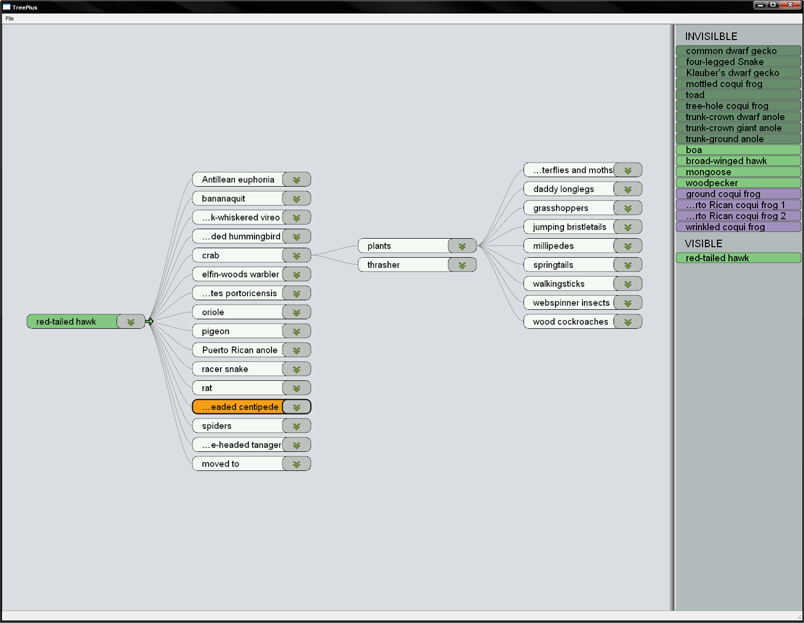
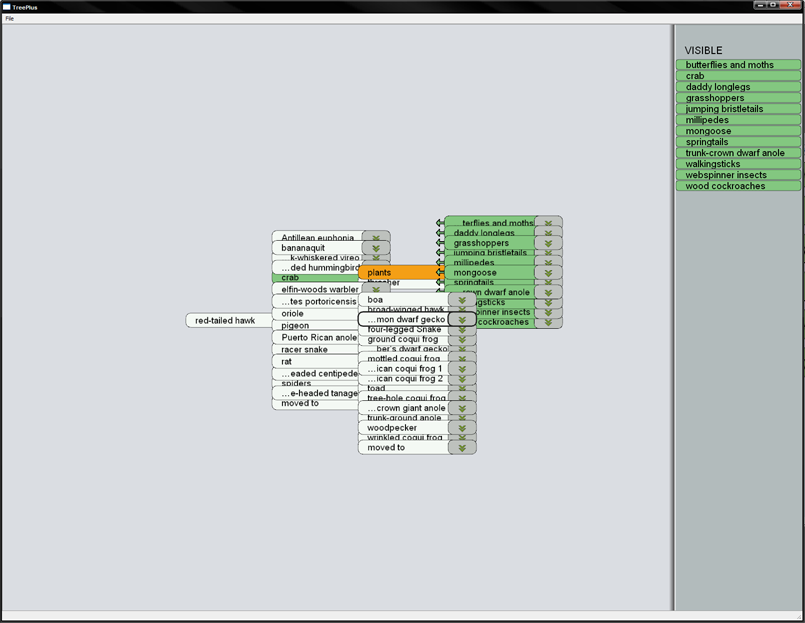
The selected node in the screenshot is "red-tailed hawk".
Preview of adjacent nodes
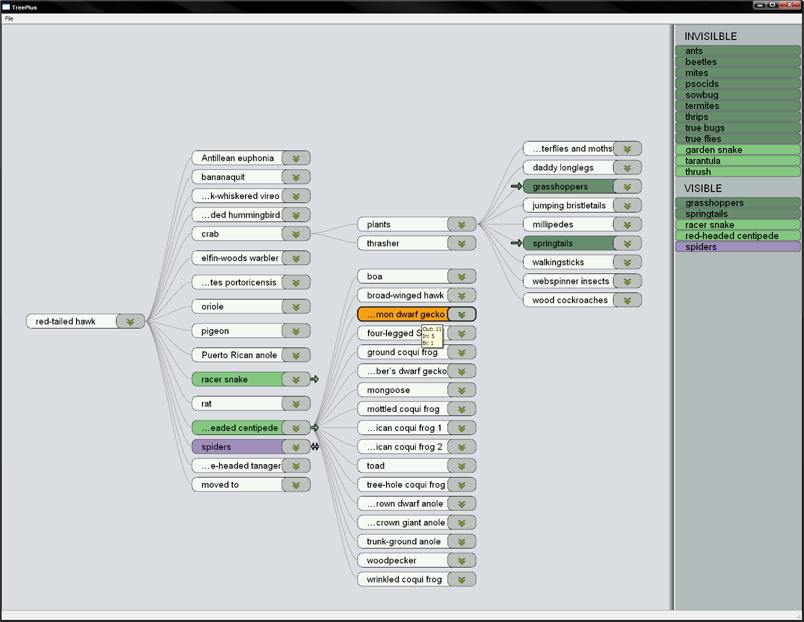
The adjacent nodes of the selected ("explored") node are listed in the "Preview Window" and grouped into invisibile and visible nodes. The nodes in the group invisible are not displayed in the "Tree Layout Window", whereas all nodes in the group visible are already in the "Tree Layout Window". The link direction with respect to the actual selected node is visualized with a color-code: dark-green represents outgoing, light-green incoming and violet nodes are bidirectional. The selected node was changed from "red-tailed hawk to "red-headed centipede" with a single left mouse button click. All adjacent nodes of "red-headed centipede" show up in the Preview Panel. The node "red-tailed hawk" is the only currently visible node.
Expand the tree
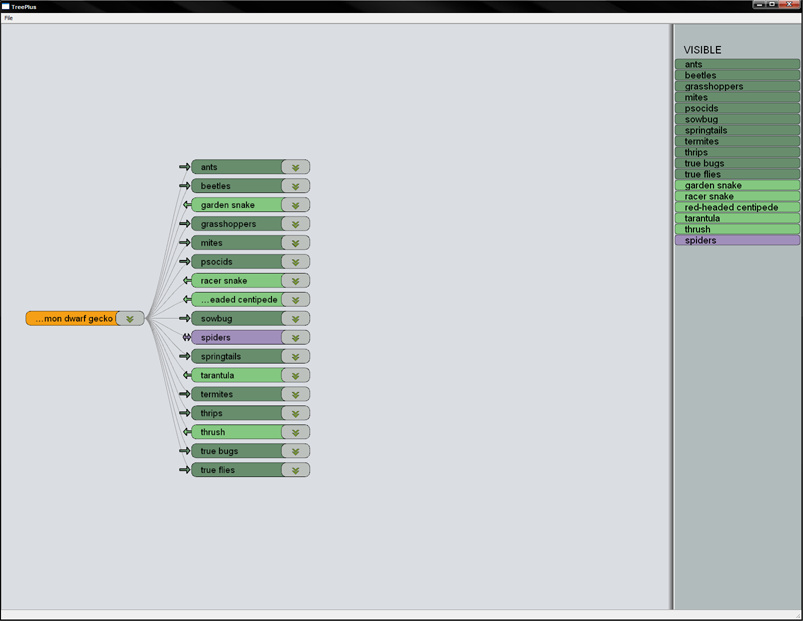
The tree can be expanded with a double mouse click on a node in the tree layout window. This process is structured in different animated steps, so that the user keeps the context. The link-direction in the tree layout window is also color encoded and additionally visualized with an arrow symbol. The node "red-headed centipede" is expanded with a double left mouse button click. All adjacent nodes move as children to this node. For example the node "boa" has an incoming link, four-legged Snake an outgoing and ground coqui frog a bidirectional link to the node "red-headed centipede".
Tooltip
Longer node names are shortened by "..." in the name. The full name and the number of adjacent outgoing, incoming and bidirectional nodes are shown as a tooltip of each node.
Moved nodes
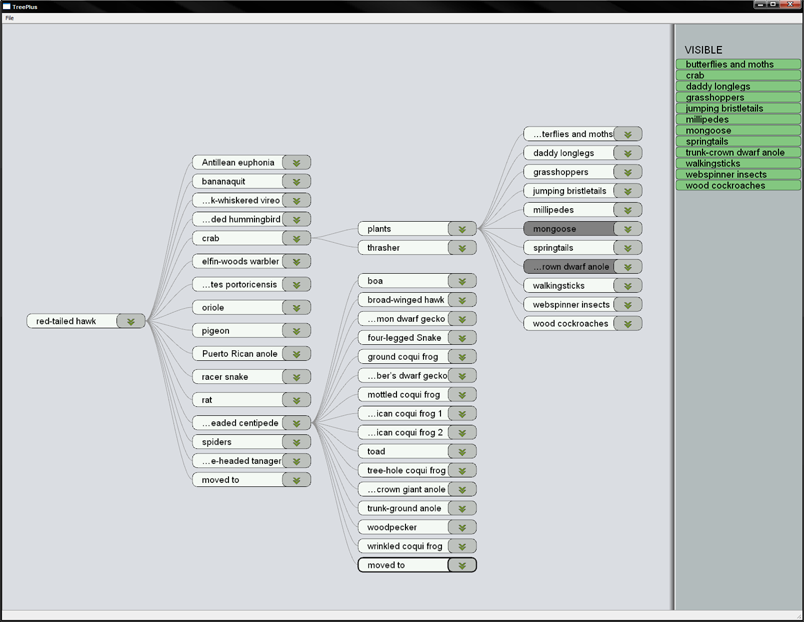
If a node changes the parent during the tree expansion a "move to" node is left behind as a child of the old parent. The moved nodes are shown in grey if the mouse cursor is over the "move to" node. In this example the nodes "mongoose" and "trunk-crown dwarf gecko" are displayed in grey, so they moved from the node "red-headed centipede" to the node "plants".
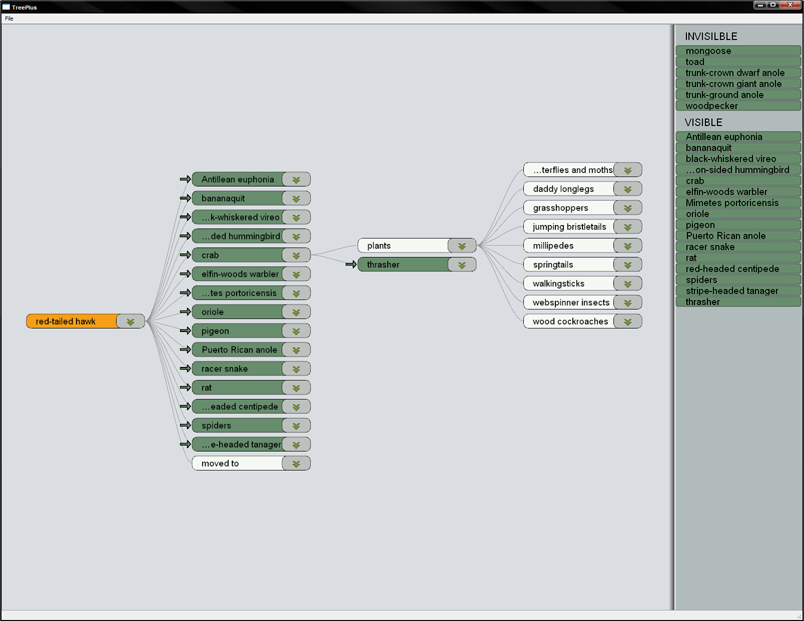
Set a new root node
To change the root node of a tree click with the right mouse button on a node and select "Set Root" from the context menu. "common dwarf gecko" is set as the new root node.
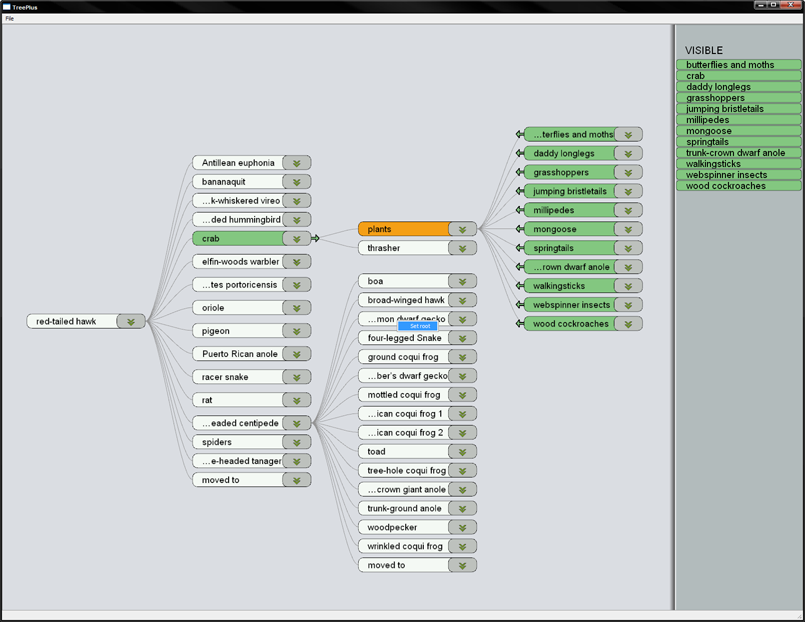
All other nodes move into the new root node.
Afterwards, the new root node is expanded automatically.
Robert Hausmair (e9709998@student.tuwien.ac.at),
Christoph Winklhofer (e0426461@student.tuwien.ac.at)
Technical University Vienna, Austria